
This classic Apple Pie, filled with an easy homemade apple pie filling and topped off with a gorgeous all butter maple leaf pie crust, is a show stopping dessert for the holiday season. Each bite is filled with sweet delicious apples, flavored with apple pie spice and flaky pie crust.

I love the cozy holiday feeling this apple pie gives me whenever it’s baking in the oven, filling the house with scents of warm spices and butter. And the decorative crust is so beautiful, it will earn its place as the centerpiece at your next Thanksgiving gathering.
Table of Contents
Why you’ll love this recipe
- Unique and beautiful – Apple pie is the quintessential Fall dessert. But this pie is more than that, it’s a work of art, an impressive center piece for all your holiday gatherings.
- Wonderful flavor – The crust is buttery and flaky, and apple pie spice gives the apple pie filling warmth and that cozy Autumn’s vibe.
- Perfect for Fall season and holidays – Nothing screams “Fall is here” more than this pie with its falling maple leaves on the top crust and lots and lots of apples to keep you happy for the rest of the holiday season.
Tools you’ll need
- A food processor or stand mixer to make the homemade pie dough though you can certainly make it by hand too.
- A 9-inch deep dish pie pan for baking your pie.
- A rolling pin – I like French rolling pins for their tapered edges, which allows for more control when rolling out the dough.
- Maple leaf pastry stamp for the top crust. You can use other Fall or Thanksgiving inspired shapes too.
- A pastry brush to brush egg wash on top of the crust.

Ingredients and substitutions
As always, you’ll find the complete list of ingredients and quantities in the recipe card at the end of this post. Below are some notes and substitution tips:
- Flour – all purpose flour will work just fine for the pie crust. But you can use pastry flour if you wish; pastry flour has a lower protein content which will yield a more tender crust.
- Sugar – I like my pie crust on the sweeter side so I use granulated sugar to add sweetness. Feel free to adjust to your taste. Granulated sugar is also used in the apple pie filling to sweeten, brown sugar can be substituted here.
- Salt – For both the pie crust and the apple pie filling, salt is added to round out the flavor. Don’t skip the salt as it adds complexity and enhances the flavor of desserts.
- Butter – I use unsalted butter for the pie crust. You can substitute salted butter if you’d like, just make sure to skip the salt called for separately.
- Water – I use cold water to bring the pie dough together. You only need to use just enough to hydrate the dough, too much water will make the pie dough too soft. You could also use some sort of alcohol instead of water, applejack would impart a nice flavor to this apple pie crust. Alcohol inhibits gluten formation, so it would make the pie crust even flakier.
- Apples – This recipe wouldn’t be an apple pie recipe if we didn’t have apples. I like to use a mix of sweet and tart, crispy and juicy apples together for the best apple pie filling. But feel free to use your favorites.
- Apple cider – brings out additional apple flavor in the filling. You can use apple juice instead.
- Lime juice – adds freshness, helps with thickening and keeps the apples from oxidizing. Lemon juice can also be used here.
- Tapioca flour – thickens the apple pie filling. You can use cornstarch as well if that’s what you have on hand.
- Apple pie spice – adds warmth and so much cozy Fall’s vibe. Feel free to use store bought or homemade.
- Egg wash – This is made with a whole egg and a tablespoon of water, beaten together. Brushing egg wash over the top crust gives your pie a golden brown sheen once baked.
- Turbinado sugar – This adds a little sparkle and crunch when sprinkled over the top crust. You can use sanding sugar too.
How to make apple pie
The following instructions, step-by-step photos, and tips are here to help you visualize how to make the recipe. You can always skip straight to the printable recipe card at the end of this post.
Prepare the pie crust
See my post on How to make Pie Crust for step by step instructions of exactly how to make pie crust, not just 1 but 3 different ways. You could also substitute store bought crust to save time.
Mix together flour, sugar, salt and work the cold butter into the mixture quickly as not to melt it. Drizzle in cold water or cold applejack to bring the dough together and shape into a disk. Rest in the refrigerate for at least 1 hour before rolling out.
Tip: Repeat this step for the second batch of pie dough. I find that the consistency of the dough is better when made in smaller batches rather than a double batch, it is also easier to handle, and you get an equal amount for both the top and bottom crust.
When the pie dough is ready, take one disk out of the fridge and roll into a circle. Place it into your pie dish and press down lightly on the bottom and sides of the dish. Trim and flute the edge. Cover with plastic wrap and place it in the freezer (if you can) or refrigerator.

Tip: I recommend freezing only metal pie dish, glass and ceramic cannot handle extreme temperature changes from freezer to oven. I did this for a long time with my ceramic pie plate, it eventually formed micro cracks and I had to throw it out.
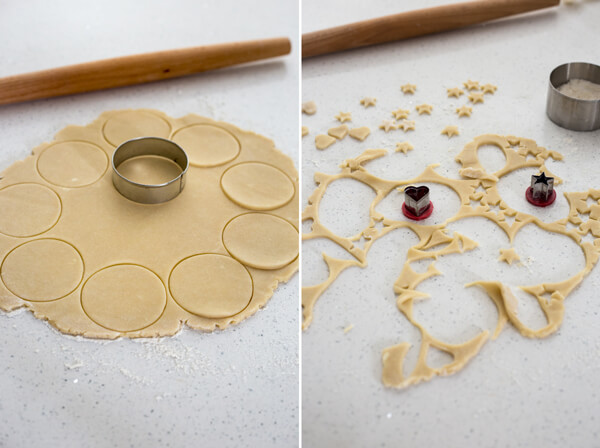
Prepare the maple leaf top crust
The top crust for this pie is quite special. It is made up of about 55 to 60 maple leaves, cut out using a pie crust stamp and frozen solid before using. It may look intimidating, but I promise you the level of difficulty is easy plus a dash of patience.
With the other disk of pie dough, roll it out to about ⅛” to ¼” thick. Use your maple leaf pie crust stamp or whatever shape you wish to use to cut out as many as you can. Place them on a lined baking sheet or whatever container you can fit into your freezer. If you need to stack them, place parchment paper in between layers. Freeze until you are ready to use them.

Tip: If you don’t have a pie crust stamp or would rather skip the leaves, simply roll the top crust out into a circle instead, for a more traditional top crust. Or try a simpler top crust using star shape cutouts like this Mixed Berry Pie.
Make the apple pie filling
Peel, core and cut the apples into slices with the same thickness, about ¼”. Add apple slices to a large mixing bowl and toss with apple cider and lime juice. Mix the sugar, tapioca flour, salt and apple pie spice in a small bowl and add this to the apple mixture, toss to combine.

Assemble the pie for baking
Once the bottom crust has been prepared and frozen solid and the oven is preheated. Take the crust out of the freezer and poke holes on the bottom and side with a fork and brush the inside of the bottom crust with egg white. Arrange the apple slices in concentric circles, or simply dump the pie filling in. Make sure to pour all the juices into the pie as well.

Tip: Egg white wash creates a protein barrier between the crust and the pie filling to keep the crust from going soggy when juice is released from the filling in the oven. Separate the egg white from the egg yolk and use just the egg white here, then when you’re done, combine the egg white and the egg yolk back together and add water to make egg wash for the next step.
Add frozen maple leaves to the top of the pie in concentric circles, overlapping each one just slightly to cover the filling. Brush the top lightly with egg wash, avoiding the tips of the maple leaves. Make a crust shield with foil to cover the outer edges. Bake until the filling is bubbly and the crust is golden.

More baker’s tips
- Freeze them! Make sure all the maple leaf decorations are frozen solid before you handle them so they don’t melt as you work. If they become too soft while you’re working with them, freezing the assembled pie a bit just before you bake it will help preserve the maple leaves shape when baked.
- Don’t burn the crust – Make sure to use a pie shield to cover the edges. If you notice corners of the leaves are starting to burn, tent the top of the pie with foil.
- Be patient – Allow the pie to cool completely before slicing so the filling has time to gel together.
- Which thickener to use – Tapioca flour or cornstarch can be used to thicken the pie filling. Either is great because they don’t add any flavor to the filling but tapioca will give you a more clear gel once cooked.
How to serve apple pie
You know how some people eat apple pie with a slice of cheddar? The first time I’ve heard of this was on NCIS, that scene with Gibbs and Mike Frank in the diner. If you’re doubtful, I suggest going with a scoop of Mascarpone Ice Cream to ease yourself onto the cheesy pie train.
If you’re still doubtful, there are plenty of other ways to top off your delicious pie. Serve it warm or at room temperature with:

Storage
This pie can be left out at room temperature for up to 2 days, but beyond that, it is best to keep leftover refrigerated. It will last an additional 2 – 3 days in the refrigerator. Cover the pie slightly with plastic wrap.
You can freeze apple pie before or after baking. It will last up to 4 months. Cover it well with plastic wrap and foil or use a freezer bag.
If making ahead, you can freeze the entire pie before baking, don’t thaw and bake straight from frozen when ready. You may need to increase the baking time to completely cook through the frozen pie, just make sure the apple pieces are cooked through and the filling is bubbly.
If you’re freezing a baked pie, thaw at room temperature before serving. I would recommend reheating in the oven, at 350 degree F, to warm the filling and crisp the crust back up.
FAQs
No, you do not have to precook the apples for this apple pie recipe because it has a long bake time. For other recipes, like this apple hand pies, the bake time is shorter so I do precook the filling.
One reader asked this question a few years back and I didn’t recommend mailing this pie since I feel like it would not arrive at the destination in one piece. However, if you vacuum seal and deep freeze the pie, then ship it very well packed with dry ice, I think it is possible. It is just a lot of work and probably quite expensive to ship a pie this way.
Absolutely! Once you prepare the pie crust and leaves, you can freeze them for up to 6 months. Just use them straight from frozen, as directed in the recipe.
No, you don’t need to. Prebaking or par-baking is only required for custard pies, fresh fruit pies or cream pies like this sweet potato pie or this peaches and cream pie.
Like I mentioned above, you’ll want to brush egg white on top of the bottom crust before adding the apple pie filling. When you bake the pie, the egg white will form a barrier to keep the crust from absorbing the juice released from the filling and prevent it from going soggy.
I’ve used this trick for all of my fruit pies with great success!

More decorated pies
- Pumpkin Pie
- Pumpkin Hand Pies
- Pear Cranberry Pie
- Apple Hand Pies
- Strawberry Tart
- Mini Blueberry Pies
- Strawberry Hand Pies
Hungry for more?
Apple Pie

Equipment
- Pie Crust Cookie Cutter
Ingredients
Crust (2x)
- 1 ½ cup all-purpose flour, 200 g
- 2 rounded tablespoon granulated sugar, 31 g
- ¼ rounded teaspoon kosher salt, 2 g
- 5 ounce unsalted butter, cold & cubed, 142 g
- 2 – 3 tablespoon cold water
Apple Pie Filling
- 3 ½ lbs of apples, 2 small Granny Smith, 1 medium Red Delicious, 3 small Honeycrisp, 1 medium Fuji and 2 small Golden Delicious
- 1 tablespoon apple cider, or apple juice
- 2 teaspoon lime juice, or lemon juice
- ½ cup granulated sugar, 90 g
- 3 tablespoon tapioca flour, or cornstarch, 22 g
- ¼ teaspoon kosher salt
- 1 teaspoon apple pie spice
Egg wash
- 1 large egg
- 1 tablespoon water
- 1 tablespoon raw sugar, or turbinado sugar
Instructions
Make the pie crust
- Note that the ingredient list for the pie crust is for 1 crust. This apple pie recipe requires a bottom and a top crust. Double the ingredients but make the two crusts separately.
- Add flour, sugar and salt in a small mixing bowl and mix thoroughly with a whisk. Transfer flour mixture to a food processor fitted with the dough blade. Add cubed cold butter to the flour mixture, pulse several times until butter is about pea and bean size. Variations in size are okay.
- Turn the food processor to “on” position and drizzle cold water over the dough mixture through the water hole, as soon as the dough starts to pull together turn the food processor off. You may need to stop the food processor in between and get a spatula to mix up the flour at the bottom.
- Turn the dough out on the counter or cutting board, and shape into a disk. Wrap in plastic and rest in the refrigerator for at least an hour. Repeat for the second batch of pie dough.
- Take the first disk of pie dough out of the fridge and roll into a circle about 2” larger than your pie dish. Use extra flour to keep the dough from sticking to the counter and roller.
- Carefully place the dough over the pie dish, lightly press the dough into the bottom and side of the pie dish, let the excess dough hang over the side.
- Trim the excess dough leaving just enough to fold under and create a fluted edge.
- Cover the pie dish with plastic wrap and keep refrigerated or in the freezer.
- Take out the second disk of pie dough, roll it out to between ⅛”-¼” and cut out shapes with a maple leaf pie stamp. Reshape the scraps and continue to cut out leaves until you have about 55-60 leaves. Place leaves on a parchment line baking sheet and freeze until needed.
Make apple pie filling
- Wash, peel and core the apples, cut into 1/4” slices and add to a large bowl. Toss with apple cider and lime juice.
- In a small bowl, add sugar, tapioca flour, salt and apple pie spice. Mix with a whisk until thoroughly combined. Toss this with the apple slices.
Assembling apple pie for baking
- Move the oven rack to the bottom third of the oven and preheat to 425°F.
- In two small bowls, separate the egg white and egg yolk. Take the pie dish out of the refrigerator or freezer and brush the bottom crust with egg white. The protein in egg white will prevent the crust from getting soggy when baked.
- Add the egg yolk back with the remaining egg white along with a tablespoon of water, beat to make egg wash.
- Add apple slices to the pie dish in concentric circles. When finished, pour any juice left over in the bowl over the apple slices into the pie dish.
- Take the frozen maple leaves out of the freezer and add them to the top of the pie in concentric circles, overlapping each one just slightly to cover the filling.
- Brush the leaves with egg wash, avoiding the tips and edges as best as you can, and sprinkle generously with raw sugar.
- Cover the outer edge of the crust with thin strips of foil to prevent the edges from burning. Bake for 55-60 minutes until filling is bubbly and the top is golden brown.
- After 30 minutes of baking, remove the edge shield made of foil strips. Check the top crust every 10 minutes during the last half hour to make sure it doesn’t burn. If it is getting too brown, tent the pie with foil loosely.
- Remove from the oven and allow to cool completely on a wire rack before slicing.
Notes
- Make sure all the maple leaf decorations are frozen solid before you handle them so they don’t melt as you work.
- If the maple leaves become too soft while you’re working with them, freezing the assembled pie just before you bake it will help preserve the maple leaves shape when baked.
- Tapioca flour will give a clearer filling and cornstarch will yield a slightly cloudy filling. But both are good for this recipe depending on what you have on hand.
Nutrition
Nutrition information is automatically calculated, so should only be used as an approximation.
 Like this recipe? Rate & comment below!
This post may contain affiliate links. For more details on how we utilize affiliates, ads, and sponsored content, see our full disclosure policy. Thank you for your continued support, which enables us to keep bringing you delicious recipes, at no extra cost to you.


A show stopping dessert for the holiday season.
Hi! Can this pie be baked and ship thru the mail? What are your thoughts?
Thank You.
I don’t think that’s such a good idea, I’m afraid it wouldn’t arrive in one piece. Unless you want to deep freeze it and mail it with dry ice and a lot of protection to keep the pie in place within the packaging… I really don’t recommend it though.
Hi!
Trying this our for Christmas Eve 🙂
Is this Apple Cider Vinegar? Or what type of cider did you use?
Thanks!
Hi Kylee, it’s just apple cider, the one in the juice bottle. I usually use a bit from what I use to make hot apple cider for the holidays. Let me know how it turns out, I hope you like it!
Hi! This recipe looks yummy! Can I make the pie crust and leaves the night before and freeze overnight? Just trying to reduce how much needs to be done the day of…
Yes, absolutely! Just fill the pie with the apple mixture the next day and bake. The only warning I would give you is to consider freezing the pie crust in a metal pan, or keep it in the refrigerator instead because glass and ceramic can crack if baked straight from frozen. I’ve done it myself and the pan ends up with microcracks and eventually gives out. The leaves, definitely freeze overnight.
Thank you for this wonderful recipe! Best apple pie I have ever made!
Thank you Lindsay!! I’m so happy you love this pie, we are never without it every year at Thanksgiving 🙂
This apple pie is seriously stunning. All those maple leaves. This can’t help but make me feel cosy just looking at it.