

Brown Butter Peanut Butter Chocolate Chip Cookies might be a mouthful name but I guarantee they will win you over with just one bite. The brown butter adds notes of toffee, making these cookies absolutely irresistible.

This Peanut Butter Chocolate Chip Cookie recipe is a mashup of these perfect Chocolate Chip Cookies and these delicious brown butter Peanut Butter Cookies. Two iconic cookie recipes in one, enhanced with a hint of toffee from the brown butter, what’s not to love?
I’ve tested these cookies multiple times over the past few months to address a crumbly dough issue that readers have reported. A slight variance in ingredients can result in a different texture in the cookie dough. But I can say with certainty that they will still bake up deliciously each time.
How to make Brown Butter Peanut Butter Chocolate Chip Cookies
You can make these cookies with just regular butter, but why not take it up a notch by starting with brown butter instead. It takes an extra 10 minutes or so of cooking the butter until it caramelizes and nutty, your effort will be rewarded.

- Start by beating together brown butter, peanut butter, and brown sugar until combined and fluffy.
- Add eggs and vanilla.
- Beat again until light and fluffy.
- Add dry ingredients.
- Beat until soft dough forms.
- Stir in chocolate chips or chocolate wafers.
- Use a large cookie scoop to portion the dough. Level the scoop with a spatula.
- Place dough balls on a baking sheet. I like to pre-portion the dough before refrigerating because it is easier to scoop.

At this point, you can bake the cookies from room temperature. If the kitchen is warm, keep the rest of the dough balls in the fridge while they’re waiting for their turn. You can also refrigerate them overnight or freeze them for later if desired.
Tips for perfect Peanut Butter Chocolate Chip Cookies
To strain or not to strain brown butter?
I’ve written a detailed post about how to make brown butter last week. Straining brown butter will result in less total butter going into the recipe. And how you strain it could result in even less butter yet.
For this recipe, you do not need to strain the brown butter. You can use it straight from the pan with the browned milk solids.
What type of peanut butter to use?
I always use Skippy brand natural honey peanut butter to make these peanut butter chocolate chip cookies. You can use other commercial brands or homemade peanut butter.
Note that natural peanut butter tends to separate, so make sure to use one that is well-mixed or you could end up with inconsistent cookie dough from one batch to the next.

A. The cookie dough on the left is made with strained brown butter and bottom-of-the-jar peanut butter which is a little thicker. All the ingredients are the same, measured with a scale, but the dough is thicker and drier.
B. The cookie dough on the right is made with unstrained brown butter and top-of-the-jar peanut butter with the separated oil mixed back in. The peanut butter in this batch is slightly runnier. The dough is wetter.
Even though these two cookie doughs are different, they both bake up fine. The dough pictured in ‘A’ is something you can scoop up and roll into a ball, it won’t spread as much. Whereas the dough picture in ‘B’ will spread a little more. However, the taste difference is hardly noticeable.
How you measure flour matters
Sifted and unsifted flour will measure differently and will yield different quality cookie dough. I’ve given the measurements in grams for this recipe if you want to get more precise.
Sifted flour lightly scooped and leveled will yield about 120 grams per cup. This is what I used in this updated recipe. You’ll need 2 ¼ cups of flour. The original recipe uses 2 ½ cups of flour and yields a slightly drier dough and some readers find it to be crumbly.
Unsifted flour scooped and leveled will yield anywhere between 135 – 140 grams per cup. You’ll end up with about 30 grams more if using the same 2 ¼ cup measurement, resulting in a drier dough.
Most store-bought flour is pre-sifted but if you want to make sure you’re getting the same measurement without a scale, just sift some flour into a large bowl using a fine-mesh sieve, then measure with your measuring cup.
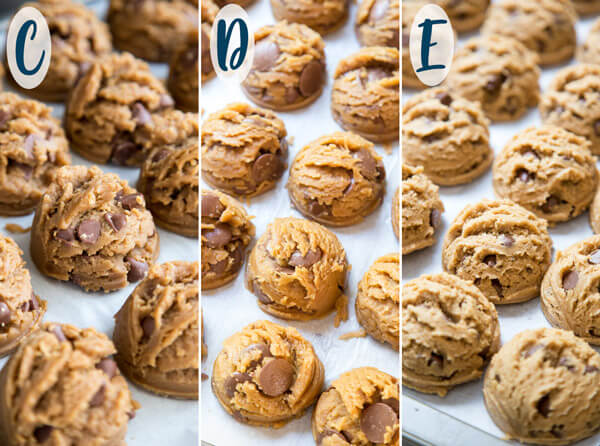
C. This dough is from the original recipe which uses 2 ½ cups of flour. It is the driest, and some readers find it to be crumbly. But that doesn’t mean a bad cookie when baked. It’s just a lot thicker and chewier. It doesn’t spread unless you force it to, using the pan banging method.
D. This dough uses 2 ¼ cups of flour, strained brown butter and thicker peanut butter. The texture of the dough is almost the same as “C”, slightly softer. It spreads a little more.
E. This dough uses 2 ¼ cups of flour, unstrained brown butter, and thinner peanut butter. The consistency of the dough is a little wetter. It definitely spreads more, be sure to refrigerate this cookie dough when the kitchen is warm with the oven on.
With dough “C” and “D”, you’ll notice some crumbs on the baking sheet next to the dough balls. I’m guessing this is what some readers are experiencing and referring to as “crumbly”.
With a drier dough, you’ll need to pack it into the cookie scoop with a spatula and it may be easier to just roll it between your hands to make a ball so crumbs don’t flake off. Again, a drier dough doesn’t make it a bad cookie. They will bake up a little differently, a little taller, spread a little less, but they are still delicious.
If you don’t have a scale and are unsure how much flour you should use, start with 2 cups and keep the other ¼ cup on reserved until you get to Step 5 (Photo 5) and see what the texture of the dough looks like. If the dough is not somewhere between “A” and “B”, add more flour to get to at least “B”.
Does baking pan matter?
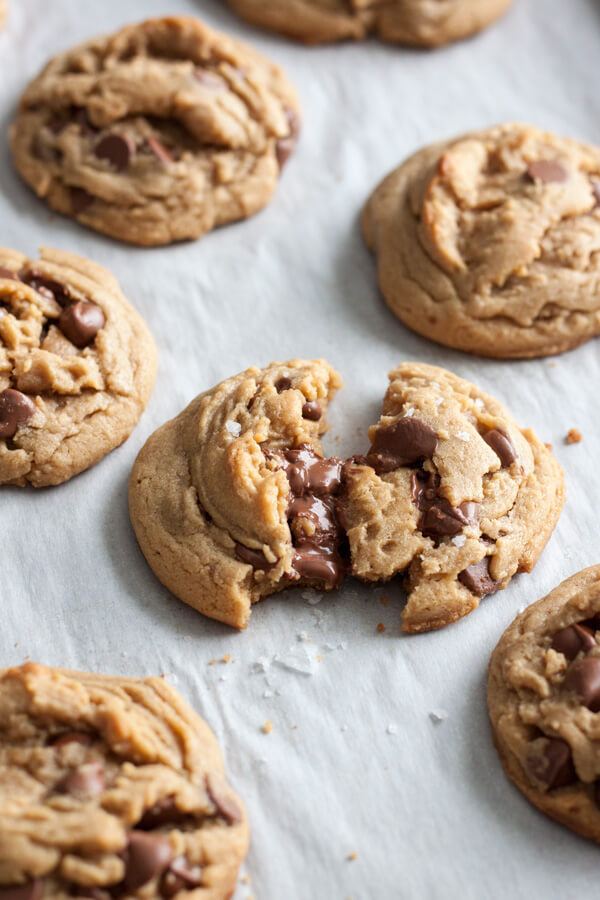
Not really, I baked these with shorter rim baking pan, taller rim baking pan, with parchment paper, with a silicone mat, they all come out pretty much the same.
The only type of baking sheet that would make a difference is an insulated baking sheet. The bottom of the cookies won’t brown as much and they will spread more if you use this type of baking sheet. I personally prefer my cookies with a darker crispier bottom.
What if I don’t want to use brown butter?
You can make this peanut butter chocolate chip cookie recipe without brown butter. I’ve done it before. But remember that regular butter contains water that cooks off when browned, so I would increase the amount of flour to 2 ½ cups to compensate for the extra liquid.
Do the type of chocolate chips matter?
Nope, as you can see from the collage above, I used large milk chocolate chips, smaller milk chocolate chips, and milk chocolate wafers. They all work. You can use semi-sweet if you prefer, or chocolate chunks.

Storing and Making Ahead
This cookie dough can be baked straight from room temperature without any refrigeration needed. But if your kitchen is very warm from the oven being on, keep the dough in the refrigerator while you’re baking each batch.
I like to pre-portion cookie dough, this peanut butter chocolate chip cookie recipe and other chocolate chip cookie recipes, before refrigeration because it is easier to scoop while it’s still soft. Once portioned into dough balls, they can be refrigerated 3 – 5 days.
You can also freeze the dough balls on the baking sheet until frozen solid, then transfer them to a freezer bag or an airtight container. They will last through the holiday season and beyond (3 – 6 months). Increase baking time by 2 minutes when baked straight from frozen.
Unique Variations of the Chocolate Chip Cookies
- Chocolate Peanut Butter Chip Cookies
- Chocolate Chip Shortbread Cookies
- Big Island Kitchen Sink Cookies
- Chocolate Mint Chip Cookies
- Chocolate Butterscotch Chip Cookies
- Toffee Chocolate Chip Cookies

These peanut butter chocolate chip cookies were a hit every time I made them, so I can guarantee you’ll love them too. They aren’t hard to love, brown butter, peanut butter, and chocolate chips, all in one delicious package you won’t be able to resist.
If you make this recipe, please let me know! Leave a comment, send me a photo, rate it and don’t forget to tag me @wildwildwhisk on Instagram. I’d love to see what’s cooking up in your kitchen. Cheers!
Brown Butter Peanut Butter Chocolate Chip Cookies

Ingredients
- 8 ounce (2 sticks) unsalted butter, yields 169 - 188 g brown butter
- 1 cup creamy peanut butter, 263 g
- 1 1/2 cup brown sugar, lightly packed, 300 g
- 2 large eggs, 97 g
- 1 teaspoon pure vanilla extract
- 2 1/4 cup sifted all-purpose flour, 270 g
- 1/2 teaspoon kosher salt
- 1 teaspoon baking soda
- 1/2 teaspoon baking powder
- 1 bag (11.5 oz) milk chocolate chip, 326 g
Instructions
- To brown butter, heat unsalted butter in a light color saucepan over medium heat. Continue cooking once butter has melted, the butter will become foamy, you don’t have to whisk yet. When the foam subsides, you will see clear bubbles, start whisking at this point to keep the milk solids from burning. When the butter starts to brown, watch the color carefully, when the butter is caramel in color and smells nutty, turn off the heat. This will take approximately 8 minutes and 30 seconds.
- Allow the butter to cool completely before making the cookie dough. It’s okay if the butter resolidified, but is still soft.
- To make the cookie dough, combine cooled butter with creamy peanut butter and brown sugar in the stand mixer bowl, beat with the paddle attachment for 1 - 2 minutes until light and fluffy. Add egg, and vanilla extract, beat for another minute or two until combined and fluffy.
- In a medium mixing bowl, whisk together sifted flour, salt, baking soda, and baking powder. Slowly add the flour mixture to the liquid mixture and stir until incorporated. Add the chocolate chip and stir until evenly distributed.
- Divide the dough using a large cookie scoop and refrigerate while the oven is preheating.
- Preheat oven to 350°F.
- Place pre-portioned cookie dough on a parchment lined baking sheet, 2" apart. Bake for 14 - 15 minutes.
- Remove from the oven and let cookies cool on the baking sheet for 5 - 10 minutes before transferring to a wire rack to cool completely.
Notes
- This cookie dough doesn’t need to be refrigerated before baking, but it is a good idea to keep them refrigerated if the kitchen is warm from the oven preheating or while the first batch is baking.
- Only bake one tray at a time to ensure even baking.
Nutrition
Nutrition information is automatically calculated, so should only be used as an approximation.
 Like this recipe? Rate & comment below!

This post was originally published on 12/13/2018. The recipe has been updated and republished on 10/29/2019 with the latest improvements, extra tips, and process photos to help you in the kitchen.


These were good, but unfortunately they didn’t turn out the way I was hoping or imagining. I agree with other commenters that the final baked cookie is much more crumbly than I prefer, especially for a brown butter cookie, which in my experience tends to bake up flatter and chewier. These fall apart when you pick them up and have a fairly flaky texture.
I also found that the brown butter flavor didn’t really come through. I used Whole Foods creamy peanut butter, which may have contributed to that. I reduced the sugar by 1/4 cup and still found them overwhelmingly sweet. I don’t think the proportions quite account for how sweet creamy peanut butter can be compared with natural peanut butter.
That said, they are still a good-tasting cookie, just not a showstopper for me. My dough was not overly dry—it was easy to work with and shape—and I did chill the dough before baking, as I always do with cookies, which may have affected the final texture.
The cookies taste good, but if you’re looking for a more refined, nutty brown-butter flavor and a chewy cookie texture, I’d probably skip this one. The flavor profile felt a little one-dimensional to me.
Thank you for trying the recipe and I appreciate your thoughtful review.