Skip the chocolate covered strawberries this year and make these delicious chocolate covered Strawberry Truffles for your Valentines. Made with just 4 simple ingredients, these unique strawberry chocolate truffle lollipops are so creamy and bursting with amazing strawberry flavor. This post was sponsored by Mars Wrigley Confectionery US, LLC.

Chocolate covered strawberries are classic Valentine’s Day desserts. But they are only as good as the quality of the fruits themselves. So if you can’t find ripe juicy strawberries, I can solve your problem with these chocolate covered strawberry truffles. They are made with freeze dried strawberries, which are available all year round, and the flavor is guaranteed to be amazing! Bonus, the leftovers will keep in the fridge for much longer than the fresh fruit version.
And if you want to make a whole bouquet of truffles this year, you can add these raspberry truffles and these pineapple truffles to your list too. They’re also made with freeze dried fruits. That stuff is a baker’s dream and comes in so many flavors!
Table of Contents
Helpful tools
You don’t need to use lollipop sticks to make these strawberry truffles. But they do make it a lot easier to dip the truffles into melted chocolate.
You do need a food processor to grind the freeze-dried strawberries into powder.
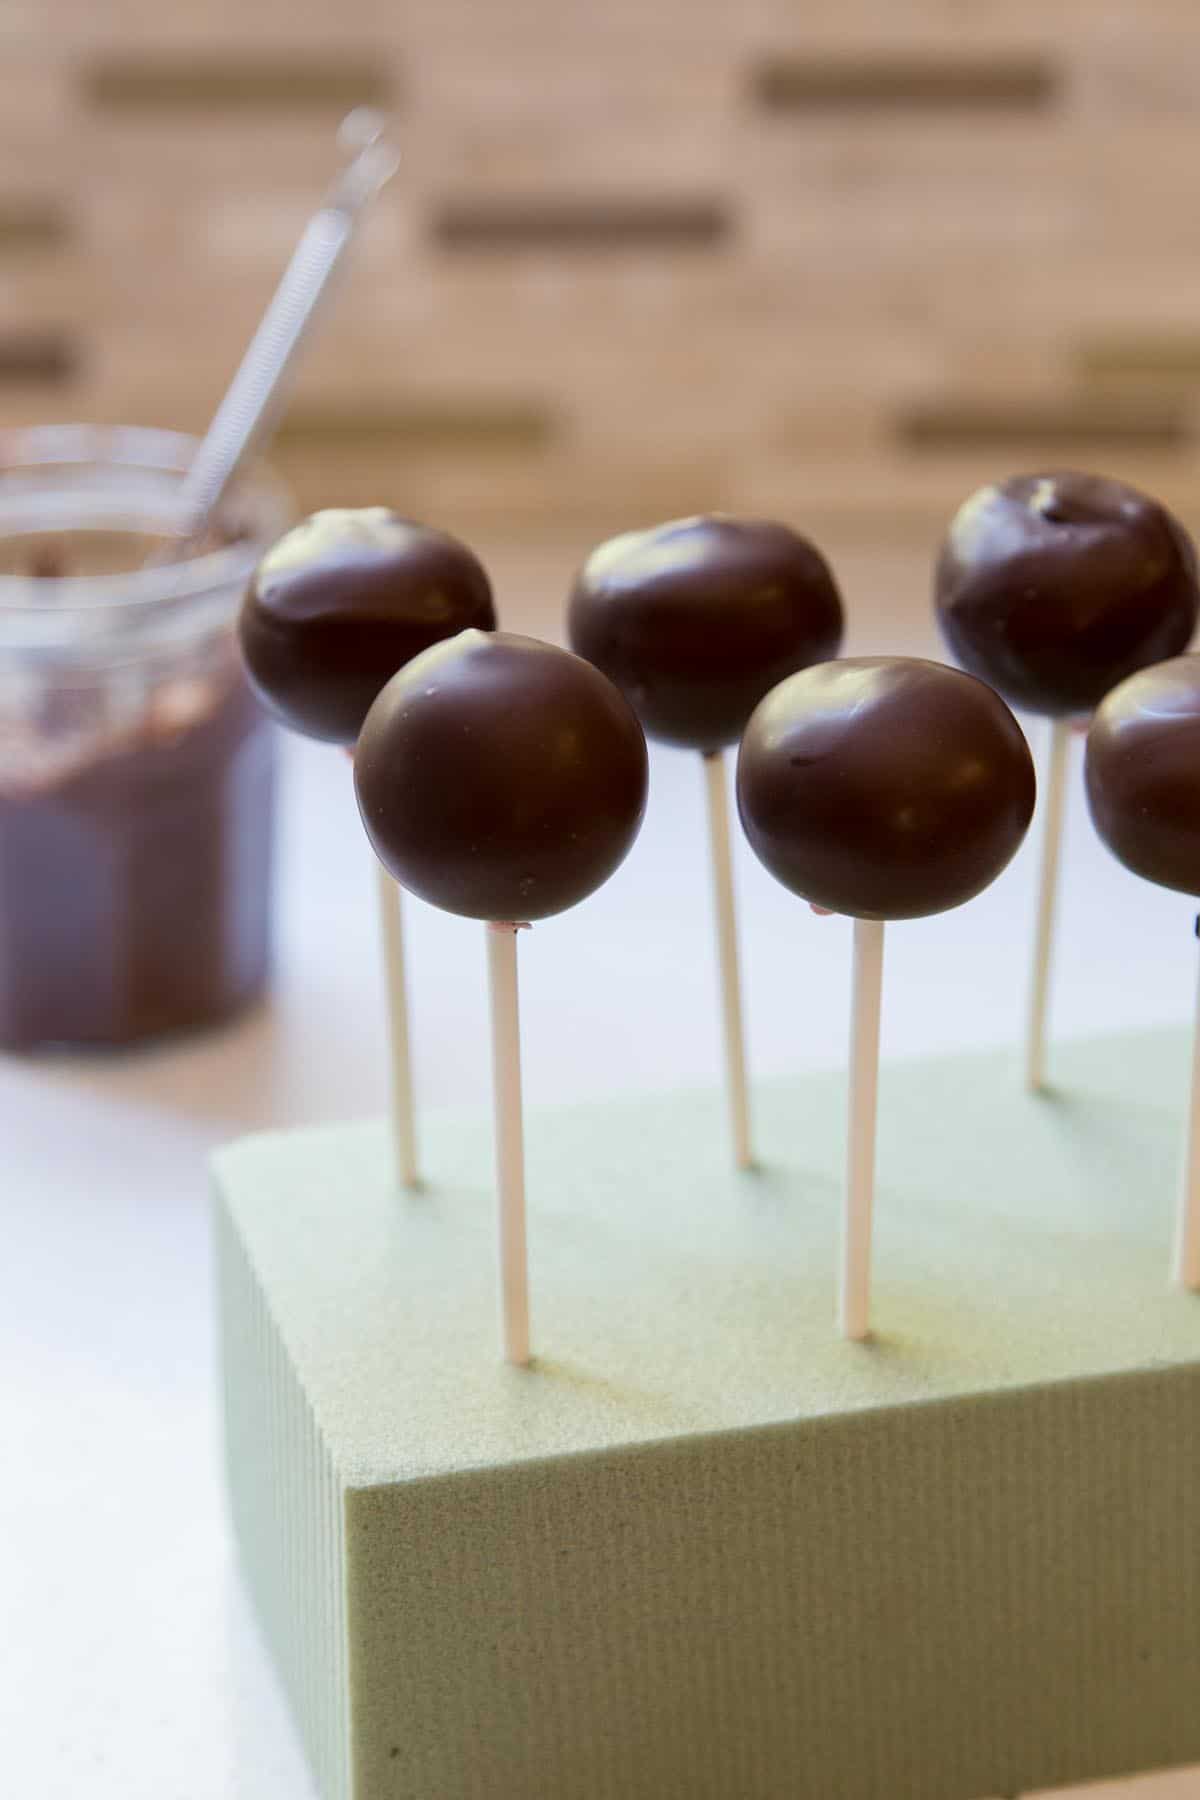
You can use a cake pop stand to dry the truffles after they are dipped. I happened to have an extra floral foam block so I used that instead. You can use anything as long as you can stand your truffle pops up without touching each other.
Ingredients and substitutions
As always, you’ll find the complete list of ingredients and quantities in the recipe card at the end of this post. Below are some notes and substitution tips:
- Freeze-dried strawberries – I usually buy mine from Target. I used one package (1 ounce) for this recipe. You can substitute other freeze-dried fruits for different flavor chocolate truffles.
- White chocolate – I used Ghirardelli white chocolate melting wafers for the truffle filling. I think white chocolate really help the strawberry flavor shine through. However, some readers have told me that they have successfully used regular chocolate as well without compromising the taste. So give it a try if you prefer a different type of chocolate.
- Heavy whipping cream
- Dark chocolate – I used Ghirardelli dark chocolate melting wafers for the coating. It is about 45% cocoa, so more akin to a semisweet chocolate. You can use a range of chocolate here from milk chocolate to really dark chocolate if you prefer. And you can also use white chocolate for the coating if you want.
- Decorations – use sprinkles and candies for optional decorations.
How to make strawberry truffles
The following instructions, step-by-step photos, and tips are here to help you visualize how to make the recipe. You can always skip straight to the printable recipe card at the end of this post.
Preparing the strawberry truffle filling
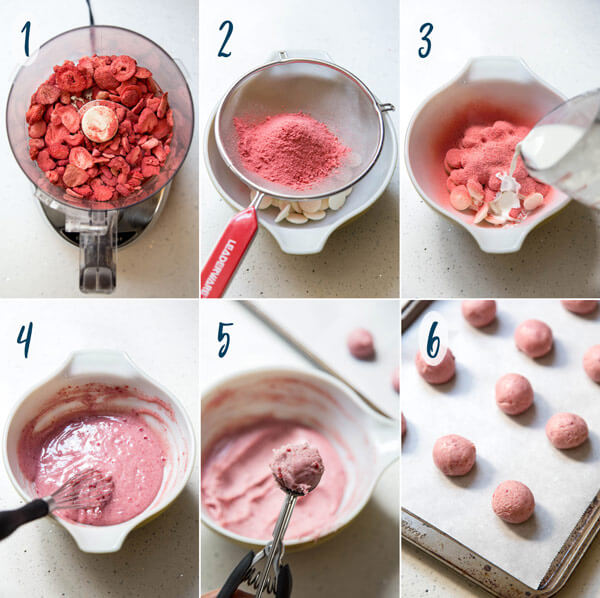
Add freeze dried strawberries to a food processor and grind into a fine powder. Let the powder settle before opening the food processor. Drape a towel over the food processor in this step to keep the powder from escaping.

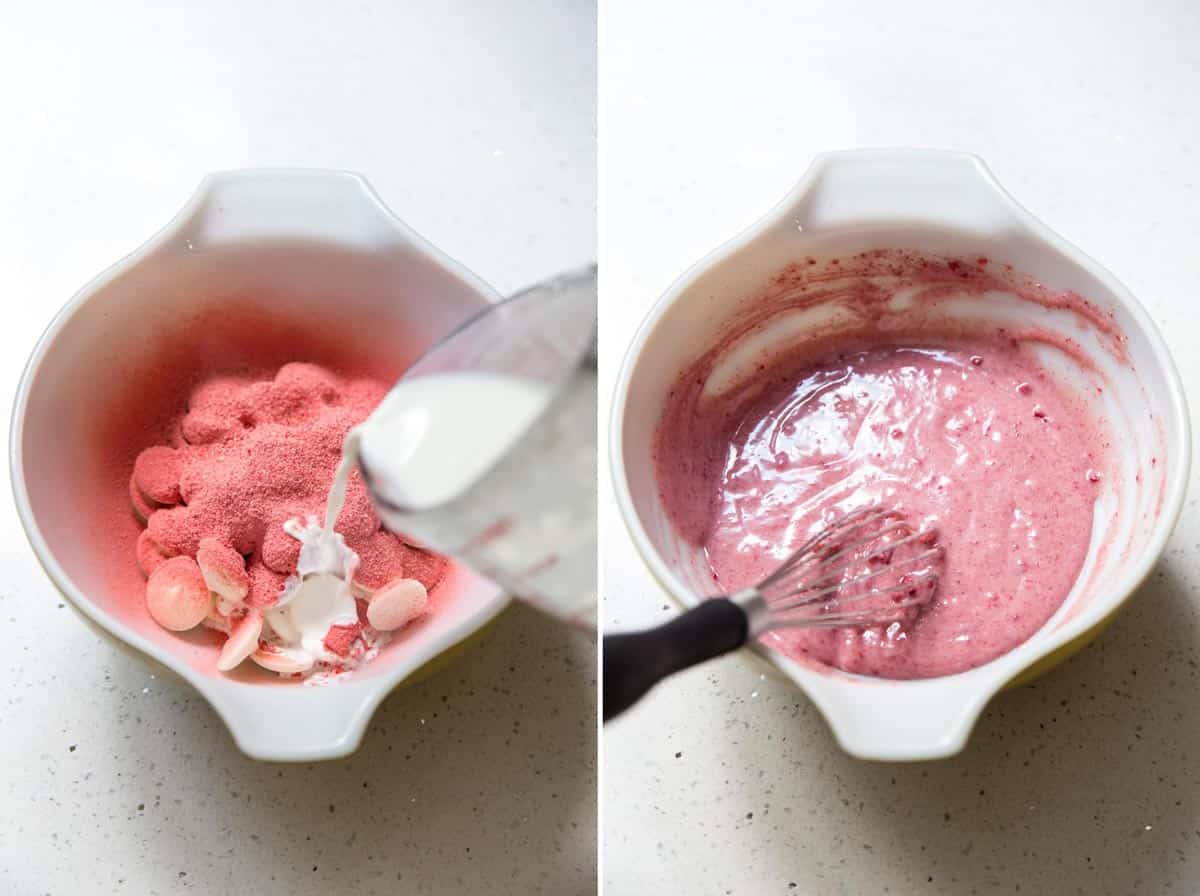
Sift the strawberry powder into a bowl with the white chocolate melting wafers. Sifting the strawberry powder through a fine mesh sieve will remove the seeds and any large pieces.

Pour in hot cream and let the mixture sit for a minute, then stir until the chocolate completely dissolves and the strawberry powder is incorporated. If the chocolate doesn’t want to dissolve completely, you can zap it in the microwave for 10 – 15 seconds interval and stir until it is smooth.
Refrigerate for about 1 hour to let the truffle filling harden but still workable and scoop it out using a small cookie scoop. Roll the truffles into balls, place them on a parchment lined baking sheet and refrigerate again for 1 more hour.
Add chocolate coating
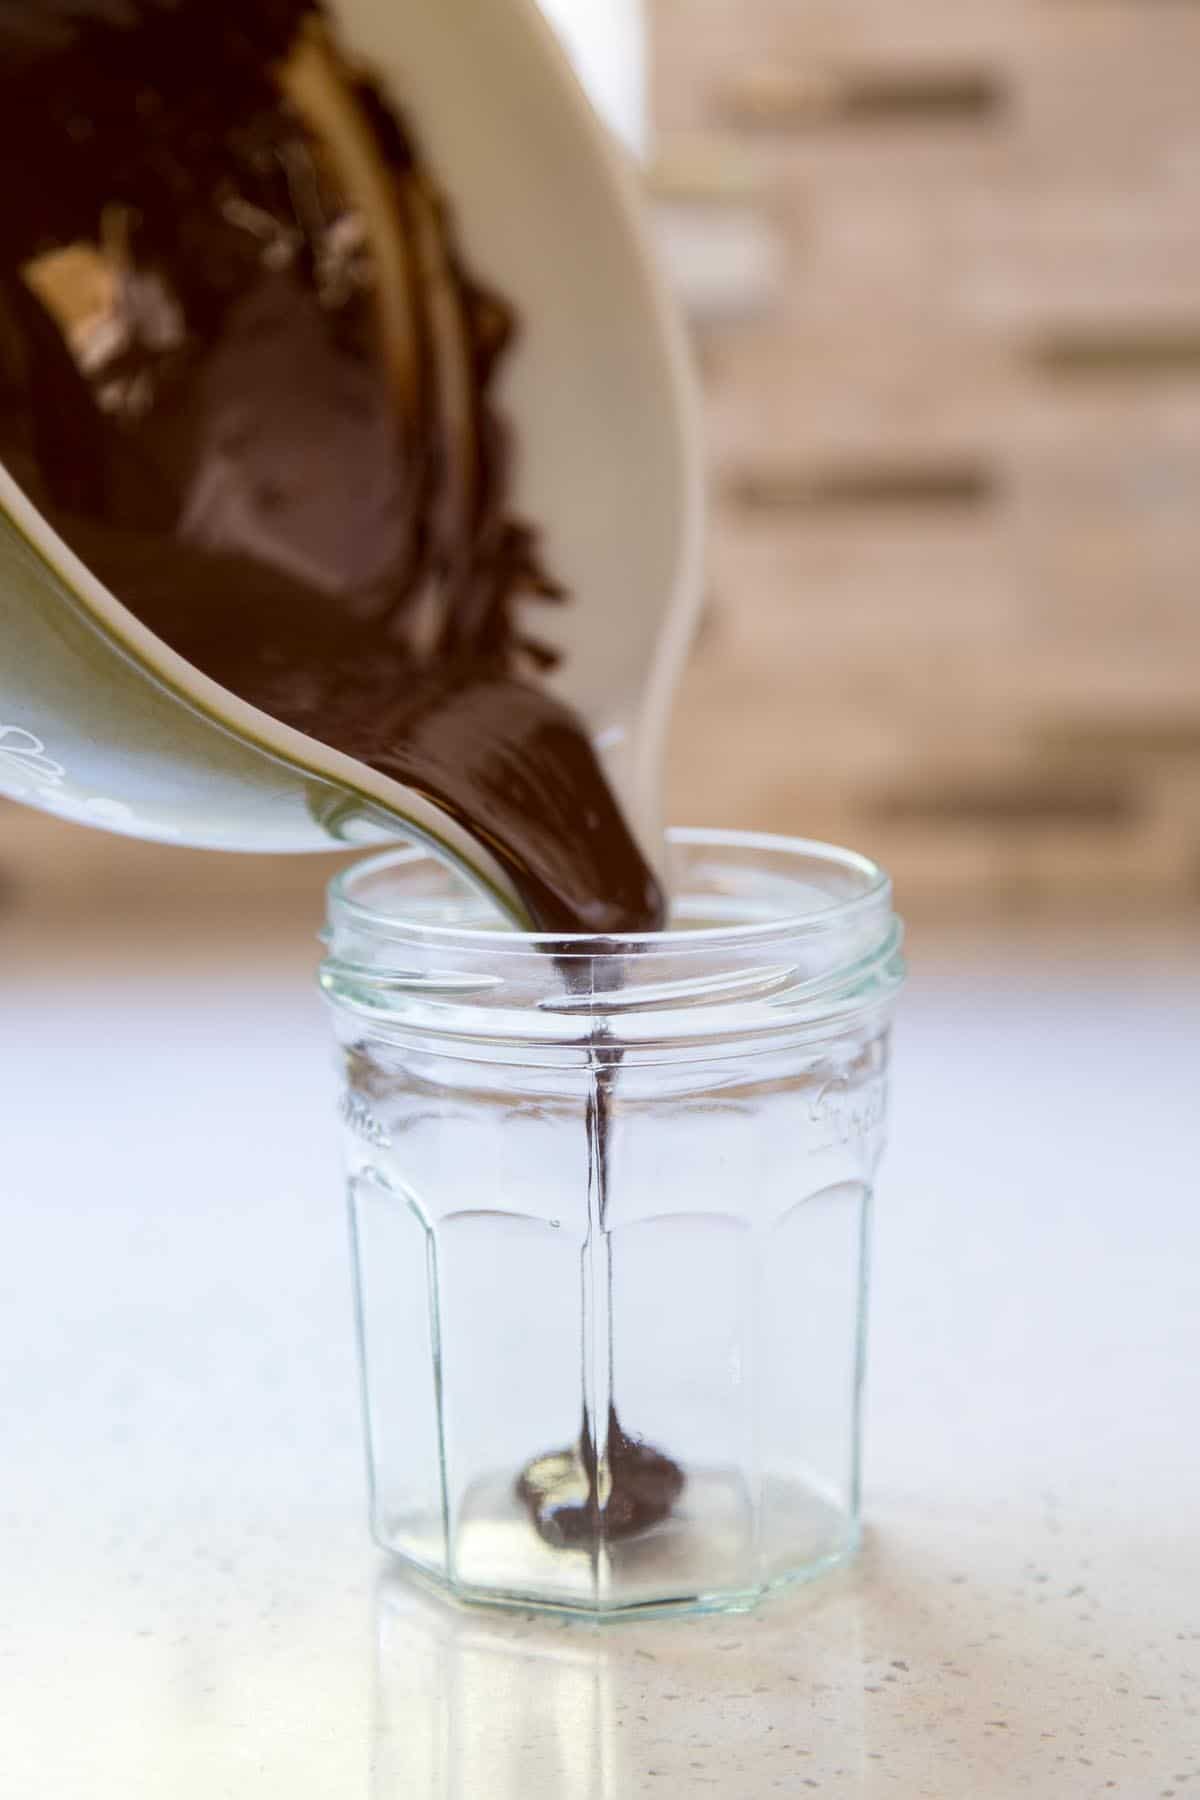
Melt the chocolate in a heatproof bowl over a pot of simmering water. Transfer it into a jar.
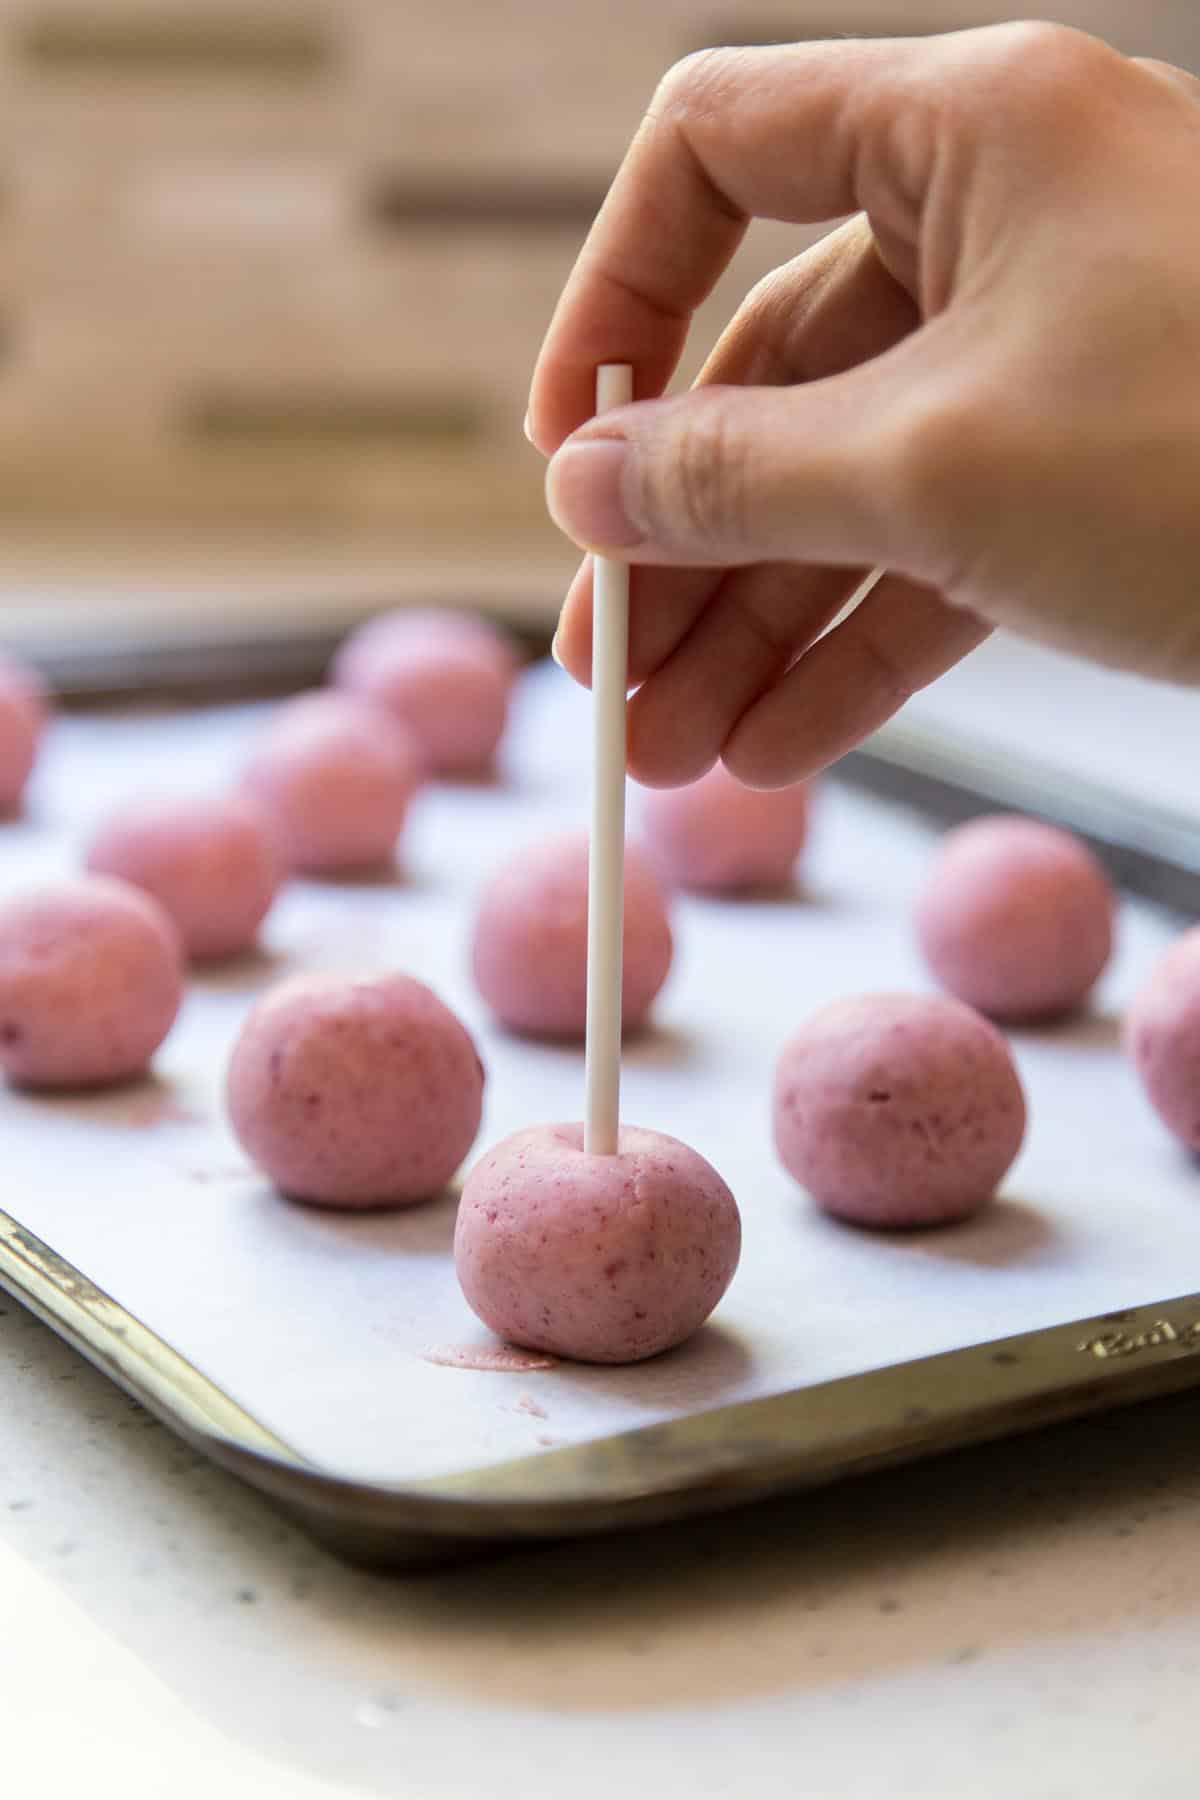
Add lollipop sticks to the truffles. You will work with a few at a time, keep the rest refrigerated or in the freezer.
Dip the strawberry truffles on lollipop sticks into the melted chocolate, swirl around to coat completely. Allow the excess to drip off back into the glass jar. If you want to add decorations, you’ll want to do it now. Dip the truffles in a bowl of sprinkles or hand place candies on top.

Stick the end of the lollipop sticks onto a foam block to allow the chocolate coating to dry with the truffle lollipops standing up, not touching each other.
More baker’s tips
- If not using lollipop sticks – keep the melted chocolate in the bowl instead of transferring it to a jar. Place the truffles on a fork and dip them into the melted chocolate. Use a spoon to drizzle melted chocolate over the truffles to cover them completely.
- Melt the chocolate low and slow – you will have more success using a double boiler or using a bowl placed over a pot of simmering water to melt the chocolate. Avoid melting the chocolate coating using direct heat or microwaving, you can end up with white specks on the coating when it hardens.
Storage
Since these strawberry truffles are made with fresh cream, they should be stored under refrigeration. Keep them in an airtight container in the fridge, or wrap them in small plastic bag individually. They will last up to 2 weeks, that is, if you manage not to eat them all in one sitting.

Even more chocolate truffles
Hungry for more?
Chocolate Covered Strawberry Truffles with Freeze-dried Strawberry

Equipment
- 13 Lollipop Sticks
Ingredients
- 1 oz freeze dried strawberries, 1 bag, 28 g
- 6 oz white chocolate melting wafers, 1 cup, 170 g
- 3 oz heavy cream, 85 g
- 6 oz dark chocolate melting wafers, 170 g
- Sprinkles and candies for decoration, optional
Instructions
- Add freeze dried strawberries to a food processor and grind into a fine powder. Let the powder settle before opening the food processor and transferring it to a bowl with the white chocolate melting wafers. Optional: sift the powder through a fine mesh sieve to remove any seeds and larger pieces.
- Heat cream in a small saucepan over medium heat until simmering but not boiling. Or microwave for about 45 seconds, watch so that it doesn’t boil over. Pour the hot cream over the chocolate and strawberry powder. Let sit for a minute, then stir with a spatula or whisk until the chocolate completely dissolves and the strawberry powder is incorporated.
- Refrigerate for 1 hour to let the truffle filling harden but still workable. Use a small ice cream scoop to portion the truffle filling into 13 pieces.
- Roll each portion into a ball, place them on a parchment lined baking sheet and refrigerate for 1 hour. Reshape into rounder balls if necessary, if the truffles are still too soft, place the tray in the freezer for about 15 minutes.
- Melt the dark chocolate in a heat proof bowl over a simmering pot of water, stirring with a spatula or whisk. When almost all of the chocolate has melted, remove it from the heat and continue to stir until it melts completely and smooth. Transfer melted chocolate into a glass jar.
- Take the truffles out of the freezer and add lollipop sticks, keep refrigerated or in the freezer, you will work with just a few at a time.
- Dip the truffle on the lollipop stick in the melted chocolate, swirl around to coat completely. Allow the excess to drip off back into the glass jar and allow the chocolate coating to dry with the truffle lollipops standing up.
- Decorate with sprinkles if desired before the chocolate coating dry completely.
Notes
- When processing the freeze dried strawberries, drape a towel over the food processor to keep the powder from flying everywhere.
- If not using lollipop stick, keep the melted chocolate in the bowl instead, place a truffle on the tip of a fork and dip the bottom of the truffle into the melted chocolate. Use a spoon to drizzle melted chocolate over the top to cover it completely.
- Use a block of foam as a drying stand for the truffles, see photo in post.
Nutrition
Nutrition information is automatically calculated, so should only be used as an approximation.
 Like this recipe? Rate & comment below!
This post may contain affiliate links. For more details on how we utilize affiliates, ads, and sponsored content, see our full disclosure policy. Thank you for your continued support, which enables us to keep bringing you delicious recipes, at no extra cost to you.


Looks great!!! Also post.
Omg, I love this idea! The photos are beautiful, too! I used to be obsesed with making cake pop type treats, but then realized I was really good at it because it was always a pain, LOL. I supposed I need to learn some tips 🙂
I hope you try again, they are so fun to make, a bit messy but a whole lot of fun 🙂
Okay, these are too stinking cute. So fun for a little Valentine’s day treat!! Definitely need to try!
Thanks Karly!