
A flaky, buttery chocolate croissant is easier to make than you think. Biting into a warm, tender pastry filled with rich, gooey chocolate will make your morning so much more delicious. Now this is something worth waking up for!
I love taking classic recipes and making them easier for beginner bakers. So, after creating this easy guide to making croissants, I couldn’t wait to experiment with some variations. A simple chocolate croissant recipe was my first choice, and it’s already my new favorite — rich, indulgent, and wonderfully simple.
Once you’ve mastered these, you can branch out and try other delicious types of croissants. Be sure to try my almond croissants or macadamia coconut croissants filled with a luscious macadamia cream. And be sure to save any leftover dough scraps, as they can be used to make these superb cinnamon twists.

Table of Contents
Helpful tools
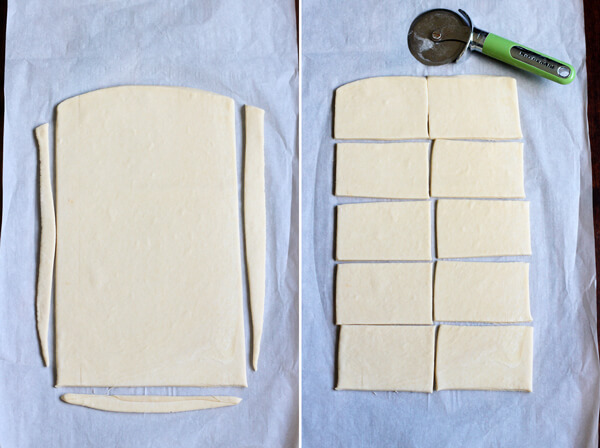
I prefer using a French rolling pin for this choc croissant recipe as it puts more pressure on the dough, resulting in a more even lamination. Having a pizza cutter helps speed up any slicing. They’re useful to keep around while working with any type of dough.
I also think it’s a good idea to invest in a decent kitchen scale — this one’s quite affordable and comes in handy not just for this chocolate croissant recipe but for so many others. I use it daily!
Ingredients and substitutions
As always, you’ll find the complete list of ingredients and quantities in the recipe card at the end of this post. Below are some notes and substitution tips:
- Melting wafers – Typically bakeries use chocolate sticks or batons for their chocolate croissant recipe. I like to use dark chocolate melting wafers instead — they melt beautifully and are easy to find at the store. You can also use chocolate chips in a pinch, or even finely chopped chocolate bars.
- All-purpose flour – Versatile and most people already have it on hand. Opt for unbleached for a better flavor and texture. Bread flour or a mixture of bread and all-purpose flour will work just fine.
- Active dry yeast – Essential for rising. Substitute with instant yeast if needed.
- Granulated sugar – Sweetens the dough while aiding fermentation.
- Unsalted butter – The key to flaky layers. Don’t substitute with salted butter.
- Salt – Important even in baking recipes! Salt enhances the flavor of the other ingredients and balances out any excess sweetness. In croissant dough, it also tightens gluten strands and helps the dough maintain structure.
- Egg – Used for the egg wash to create a golden crust on each chocolate croissant. Any fresh, large egg works. Substitute with milk or cream for an egg-free softer finish if needed.
- Water – warm water is used for the poolish and croissant dough. And just a tablespoon is used to mix with the egg for the egg wash.

How to make a chocolate croissant
The following instructions, step-by-step photos, and tips are here to help you visualize how to make the recipe. You can always skip straight to the printable recipe card at the end of this post.
Day 1 & 2: Make the dough and laminate
My technique takes place over 3 days. For detailed step-by-step photos of the process on Day 1 and Day 2, check out my earlier post on how to make a croissant. In it, I cover everything from preparing the poolish to making the dough. Once you’ve reached the end of Day 2, you can then follow these instructions to create chocolate croissants.

Day 3: Form the croissants
Start by making an egg wash and taking the dough out of the fridge. In this choc croissant recipe, we’ll work with one piece while the other one rests in the refrigerator.
Place the dough with the short end facing you and roll out to about 18″ x 10″. If the sides aren’t perfectly straight, don’t worry. You can trim them with a pizza cutter or knife. Trim the dough into a perfect rectangle about 17″ x 9″.

Now, cut into half lengthwise, then cut each half into 5 pieces, each about 4 ½ x 3 ⅜ inches. All together, you should have 10 rectangles.
Add the chocolate filling
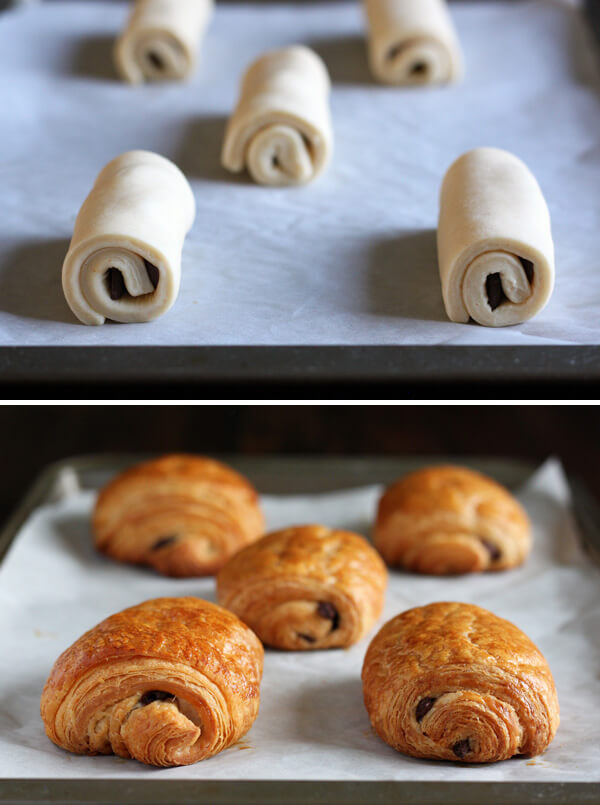
Next, we’ll start adding in the chocolate. For each piece of dough, use 4 chocolate wafers (broken up), or about ¼-ounce of chocolate chips.
Place half of the chocolate along the shorter edge of the dough, about ½ inch away from the edge, and the other half right about the middle. Brush the opposite edge with egg wash, then roll it up.

Final steps before baking
Finally, place the formed croissant on a parchment-lined baking sheet. Repeat this for each piece of dough before allowing the chocolate stuffed croissants to proof for up to 5 hours at room temperature.
Tip: If you want to make these the next day, keep the completely formed chocolate croissants refrigerated. Remember that you need to let it sit out for an hour or so to warm up and then proof for 4-5 hours before baking. To proof them more quickly, turn your oven into a proofing box – place a tray of boiling water on the bottom rack and put the croissants on the rack above. They’re ready to go when they become really puffy.
Bake
Preheat oven to 325 degrees F. Brush the top of each croissant with egg wash and bake for 35-40 minutes. When golden brown, take the chocolate croissants out of the oven. They will finish cooking for a little while longer. Let them cool slightly before serving.

Storage
Chocolate stuffed croissants will keep for about 1-2 days in an airtight container at room temperature, or up to 3-5 days in the fridge. That said, the refrigerator is not ideal. The croissants will harden in the fridge, so I typically store mine in a container on my countertop. But toasting them can help refresh and crisp them back up.
If you are looking to store them for longer, consider freezing them. When done correctly, the texture shouldn’t change too much! I like to individually wrap each chocolate croissant in several layers of foil before adding them to a zip-top bag. They will keep for up to 2 months.
To reheat, I recommend using the oven — 5-7 minutes at 350 degrees F should do the trick. You can reheat directly from frozen, though be sure to let them heat for a few extra minutes to ensure they’re warmed through.

Hungry for more?
Homemade Chocolate Croissant Recipe

Equipment
- Pizza Wheel
Ingredients
Poolish
- 100 g all-purpose flour, ¾ cup
- 100 g warm water, ½ cup
- A pinch of active dry yeast
Dough
- 500 g all-purpose flour, 3 ½ cup + 2 tablespoon
- 75 g granulated sugar, ¼ cup + 2 tablespoon + 1 ½ teaspoon
- 15 g kosher salt, 2 ½ teaspoon
- 100 g unsalted butter, about 3.5 oz
- 10 g active dry yeast, 1 tablespoon
- 200 g water, about 1 cup
For Lamination
- 330 g unsalted butter in one block, about 11.6 oz
Egg wash
- 1 egg
- 1 tablespoon of water
Chocolate Filling
- 5 oz of chocolate chips or melting wafers
Instructions
Day 1 – Make the poolish
- Mix 100 g of AP flour with a pinch of active dry yeast and 100 g of warm water in a small bowl, cover and let ferment at room temperature over night, for at least 15 hours and preferable longer.
Day 2 – Make the dough
- Cube 100 g of unsalted butter and allow to soften at room temperature before mixing into the dough.
- Also let the big block of butter to be used for lamination soften at room temperature.
- Measure out all ingredients in separate bowls to ensure a smooth process.
- Warm the water to about 100°F and add it to the stand mixer bowl.
- Stir in 2 teaspoons of sugar and the yeast and let bloom for at least 15 minutes. Use sugar from the amount specified in the ingredient list and not in excess.
- When the yeast mixture is puffy, add the rest of the ingredients to the bowl including the poolish, flour, remaining sugar, salt and soften butter.
- Knead with the dough hook for 20 minutes.
- Grease a large glass bowl with oil.
- Turn the dough out from the mixing bowl onto a lightly floured board or counter. Flatten with your hand and stretch into a small rectangle, fold it like a letter. Repeat once more.
- Place the dough into the oiled bowl and let rise for 1 ½ hours.
- Place the big block of butter on top of a piece of parchment paper, place another piece of parchment paper on top of the butter and flatten it with a rolling pin into a rectangle about 6.5” x 7.5”. Wrap it up in parchment paper and refrigerate until ready to use.
- When the dough in the bowl has risen, turn it out onto a lightly floured counter and flatten by hand into a rectangle about 10” x 7.5”, place on a parchment line baking sheet, wrap with plastic and place in freezer for 20 mins.
- Meanwhile, take the piece of butter you prepared early out of the refrigerator to allow it to soften a bit.
- Take the dough out of the freezer and roll out into a rectangle about 16” x 7.5”.
- Place the cold but slightly soft flattened butter rectangle in to the middle and fold the dough over it. Pinch the two ends to encase the butter.
- Dough lamination turn 1: turn the dough so the short end/open end faces you and roll out to a rectangle about 22”x9”. Fold into third like a letter. Place the folded rectangle on the baking sheet and freeze for 15-20 minutes until the dough is cold but still pliable.
- Dough lamination turn 2: take the dough out of the freezer and place the short end facing you again with the opening to the right, roll out to a rectangle about 22”x9”, fluffing, flipping and turning the dough as you go. Fold into third like a letter. Place the folded rectangle on the baking sheet and freeze for 15-20 minutes until the dough is cold but still pliable.
- Dough lamination turn 3: repeat everything in dough lamination turn 2.
- End of lamination: take the dough out of the freezer and place the short end facing you again with the opening to the right, roll out to a rectangle about 24”x9”, fluffing, flipping and turning the dough as you go. This time, cut the dough in half crosswise into two 12”x9” rectangle. Place parchment paper between the two pieces. At this point, to continue working, freeze the dough for 15-20 minutes. Or if you want to continue the next day, wrap well and refrigerate overnight.
Day 3 (or day 2 continuation) – Form the croissants
- Beat one egg with 1 tablespoon of water to make egg wash.
- Take the dough out of the freezer (or fridge), work with one piece at a time while the other one rest in the refrigerator. Place the dough with the short end facing you and roll out to about 18”x10”. The ends are not going to be perfectly straight. That’s okay, we will trim them off.
- Trim the dough into a perfect rectangle about 17”x9”. Cut into half length wise and cut each half into 5 pieces, each about 4 ½” x 3 ⅜”. This will give you 10 rectangles.
- For each piece of dough, use 4 chocolate wafers – broken up, or about ¼ oz of chocolate chips. Place half of the chocolate along the shorter edge of the dough, about ½” away from the edge, and the other half right about the middle. Brush the opposite edge with egg wash. Roll it up. Place the formed croissant on a parchment line baking sheet.
- Repeat the previous steps with the rest of the cut up rectangles. Place croissant at least 2” apart from each other on the baking sheet.
- Then repeat all previous step with the second piece of dough that has been resting in the refrigerator.
- Sprinkle plastic wrap with some flour and cover the baking sheet. Let proof at room temperature for 4-5 hours.
- Preheat oven to 325°F.
- Brush egg wash lightly all over each croissant.
- Bake one tray at a time for 35-40 minutes.
- Cool on a wire rack before serving.
Notes
- Work as quickly as you can during the dough lamination steps. At any time during these steps, if you feel that the dough is getting too warm or too elastic. Pop it back into the freezer for 5 minutes to keep it cold so the butter doesn’t melt into the dough, and to relax the gluten.
- Use only as much flour as needed while rolling to keep dough from sticking. This dough should be very easy to handle and should not require a lot of extra flour, except for perhaps at the very end.
- Save the dough scraps in a container and refrigerate or freeze, use later to make Cinnamon Twists.
Nutrition
Nutrition information is automatically calculated, so should only be used as an approximation.
 Like this recipe? Rate & comment below!
This recipe is adapted from Thomas Keller’s Bouchon Bakery.
This post may contain affiliate links. For more details on how we utilize affiliates, ads, and sponsored content, see our full disclosure policy. Thank you for your continued support, which enables us to keep bringing you delicious recipes, at no extra cost to you.


En vez de agua, puedo usar leche?
Sí, asegúrese de hervir la leche a fuego lento, pero déjela enfriar por debajo de los 100 grados F antes de usarla.
Planning to make for Christmas morning. If I want to prep head of time and bake these that morning, can I shape through step 6 and then refrigerate overnight, take out for a hour, and then bake? Is there another process you would recommend? Thank you.
Hi Ana, yes, I would definitely prep ahead since making these from scratch will take 2-3 days anyways. Work through Step 6 on Day 3 in the recipe card, but notice that I proof for 4-5 hours before baking so you may need to take them out for well over an hour. Because it’s been so cold, you may not see them rise a lot proofing overnight in the refrigerator. You want them really puffy before baking. So just check and adjust as needed. I would definitely take them out of the fridge as soon as you wake up Christmas morning and place them in a warm place. You could turn the oven into a proofing box by placing a tray with boiling water on the bottom rack and place the croissants on the rack above.
what would you recommend covering the poolish with?
I would use a clean kitchen towel.
berry good recipe. Be prepared for a lot of waiting and in my opinion- extra chocolate! Although it would be helpful to add more visual aids to better understand each process.
If you’re looking for more visuals on how to make the croissant dough, take a look at my photos from the croissant post.
Thank you So Very Much. Yummy.
Nice Article!! Thanks for sharing the recipe
Thank you Tony!
I love love love chocolate croissants and yours look so perfectly flaky too
One of my fav for sure! Thanks Marie!