
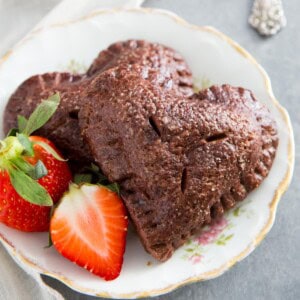
These Chocolate Hand Pies with strawberry filling are exactly like chocolate covered strawberries but in pie form! Made with a flaky chocolate pie crust and an easy orange strawberry pie filling, they are the perfect bite of sweet treats for Spring and Summer.

While you may immediately think Valentine’s day when you hear chocolate covered strawberries, I give you permission to enjoy these chocolate covered strawberry pies on a Tuesday! Because why not? They are a variation of my decorated strawberry hand pies but with a chocolate crust, and they are a wonderful summer treat.
Table of Contents
Why you’ll love these chocolate hand pies
- Individually sized portions – this strawberry chocolate pie recipe yields 9 perfectly sized hand pies you can take on the go and snack on anytime of the day.
- Quick and easy filling – The one pot strawberry pie filling takes just 5 minutes to throw together. You could also use leftover strawberry compote or strawberry jam for the filling.
- Play with the shapes – use different shape cookie cutters for the crust to make it any shape you want. I made these heart shapes for Valentine’s day!
Tools you’ll need
You will need the following tools to make these chocolate hand pies:
- A food processor or stand mixer to make the chocolate pie dough. Or you can make it by hand too!
- Rolling pin to roll out the pie dough.
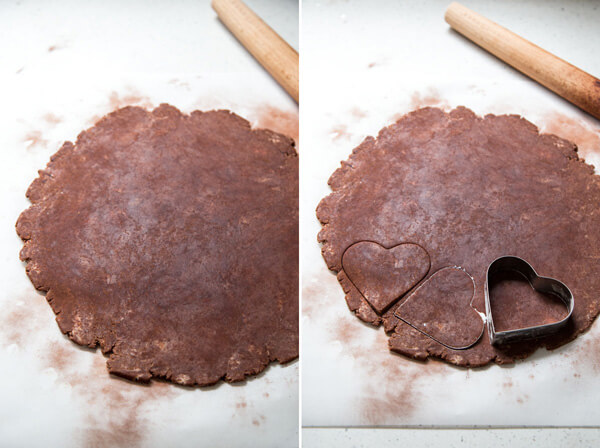
- 3″ cookie cutters to cut the crust for your hand pies. I used heart shape here but any shapes will work.
- A baking sheet with parchment paper or silicone baking mat to bake the pies on.
- A pastry brush to apply egg wash.

Ingredients and substitutions
As always, you’ll find the complete list of ingredients and quantities in the recipe card at the end of this post. Below are some notes and substitution tips:
- One batch of chocolate pie dough – this includes all-purpose flour, cocoa powder, granulated sugar, salt, unsalted butter, and cold water.
- Strawberry pie filling – made with fresh strawberries, orange zest, orange juice, granulated sugar, cornstarch, and just a pinch of salt. Frozen strawberries will also work here. If you already have a batch of strawberry compote siting in the fridge, just use that or strawberry jam as the filling instead.
- Egg wash – one egg and a tablespoon of cream, milk, or water, beaten together. This mixture get brushed on the surface of the pie crust to create shine when baked. It is also use a “glue” for the pie crust edges.
- Turbinado sugar – sprinkle this on top of your hand pies for sparkle and a little texture. White sanding sugar will work too.
How to make strawberry hand pies with chocolate crust
The following instructions, step-by-step photos, and tips are here to help you visualize how to make the recipe. You can always skip straight to the printable recipe card at the end of this post.
Make the strawberry pie filling
Cook fresh (or frozen) strawberries, with orange zest, orange juice, sugar, a pinch of salt and cornstarch to thicken. It should take just 5 minutes to bring the filling together.

Tip: Precooking the filling is crucial here since the bake time for strawberry hand pies is much shorter than a traditional berry pie. It gives us an opportunity to thicken the filling before hand which makes adding the filling to the hand pies much easier.
Make the pie crust
You’ll need one batch of chocolate pie dough for this recipe. You can use a food processor or a stand mixer with the paddle attachment, or simply make the pie dough by hand. Refer to my post for chocolate pie crust for more details and tips.
Similar to a regular all-butter pie dough, you’ll want to mix together flour, cocoa powder, sugar, salt and work the cold butter into the mixture quickly as not to melt it. Drizzle in cold water to bring the dough together and shape into a disk. Refrigerate for at least 1 hour before rolling out.

Once the dough is ready, you will roll it out to about ¼” thick. Use a 3″ cookie cutter to cut out 9 pieces for the top crust. Re-roll the scraps and roll the dough back out to about ⅛” or slightly thicker. Cut out 9 more pieces for the bottom crust.
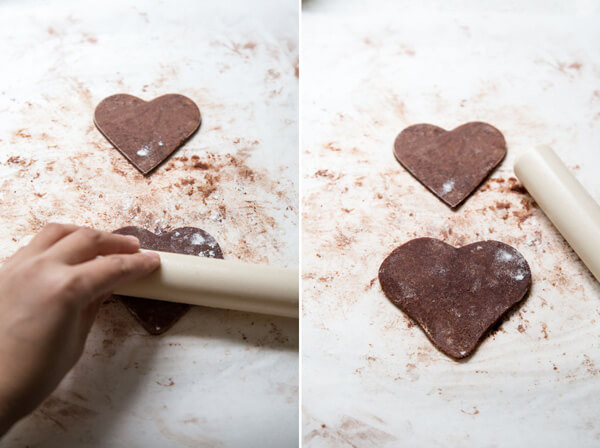
Tip: The reason for the different thickness of the top and bottom crust, with the top crust being a little thicker, is because you’ll want to later roll them out a little larger than the bottom crust to allow them to drape over the filling.
Assemble the chocolate hand pies
Working with just 2 pieces of dough at a time while keeping the rest refrigerated, roll out the top crust a little bit lager.
Brush egg wash on the outer edge of the bottom crust, add the strawberry pie filling. Drape the top pie dough over the filling, press the edges together and seal with a fork.

Freeze the fully assembled strawberry hand pies in the freezer while the oven is preheating. When ready, placed on a lined baking sheet, prick a few vent holes using the tip of a paring knife. Brush the pies generously with egg wash for shine, and sprinkle turbinado or sanding sugar over the top to add a little sparkles before baking.

Note: Since the chocolate pie dough is dark, you won’t be able to tell the doneness by looking at the surface of the pie and seeing if it turns golden brown. But you’ll be able to see the filling bubbling through the vent holes. The hand pies should be done baking by 20 to 22 minutes.
More baker’s tips
- Use cocoa powder for rolling – you can use flour for rolling but it could leave some white marks on the surface of the hand pies, so I recommend using cocoa powder instead to keep the surface of the baked pie crust more uniform.
- Keep the dough cool – while you’re working to assemble the pies, keep whatever dough you’re not working with in the refrigerator. Cool dough is easier to work with.
- Freeze to keep their shape – if you’re making your hand pies into any type of shapes like heart shapes, star shapes, etc. it is even more crucial to freeze the fully assemble hand pies before baking so they don’t spread as much in the oven. Use a smaller baking sheet for this step so you could fit it into your freezer if required, then transfer them to a larger baking sheet for the oven later.
Storage
These mini strawberry chocolate hand pies taste best on the day they are baked. However, leftovers can be kept at room temperature overnight or refrigerated for up to a week. I recommend keeping them refrigerated to keep the fruit filling fresh, unless you use store bought jam for the filling.
You can also keep them for up to 3-6 months in the freezer. Make sure to store them in an airtight container. And thaw completely at room temperature before serving.
If you prefer your strawberry hand pies warm with crispy crust, toast them up in the oven at 350°F for about 5 – 7 minutes.
FAQs
Yes, certainly! Once your strawberry hand pies are fully assembled, without egg wash and sugar on top, place them on a lined baking sheet and freeze until solid. Then transfer them to an airtight container or freezer bag and keep frozen for up to 3 months.
When you want to bake them, simply add egg wash, sprinkle with turbinado sugar and bake them straight from frozen at the same oven temperature, DO NOT thaw.
Yes, as I have mentioned in the ingredients and substitutions section, you can use frozen strawberries to make the strawberry pie filling. They work as a great substitute for fresh strawberries in this recipe if you’re making them out of season.
Yes, I think raspberries will go well with this chocolate hand pie recipe too.
If you are egg free, I recommending using a milk wash since you will need some sort of moisture to seal the top and bottom crust together. However, the pies may not come out as shiny with just a milk wash on top.

More chocolate and strawberry recipes
- Strawberry White Chocolate Scones
- Chocolate Strawberry Shortcake
- Chocolate Covered Strawberry Truffles
Hungry for more?
Chocolate Hand Pies with Strawberry Filling
Ingredients
1 batch of chocolate pie dough
- 1 ¼ cup all-purpose flour, 165 g
- ¼ cup cocoa powder, 22 g
- ¼ cup granulated sugar, 50 g
- ¼ rounded teaspoon kosher salt
- 5 ounce unsalted butter, cold and cubed, 142 g
- 4 – 5 tablespoon cold water
- Extra cocoa powder for rolling
Pie Filling
- 1 pound fresh strawberry, 454 g
- Zest of ½ orange
- 1 tablespoon orange juice
- ¼ cup granulated sugar, 50 g
- 3 tablespoon cornstarch, 21 g
- A big pinch of kosher salt
Egg wash
- 1 large egg
- 1 tablespoon of cream, milk or water
- Turbinado sugar
Instructions
Prepare the strawberry filling
- Wash and dry the strawberries and orange.
- Zest and juice the orange.
- Add sugar, salt and cornstarch to a small bowl and mix to combine.
- Hull and chop the strawberries into bite size pieces and add to a small sauce pan. Sprinkle the cornstarch mixture over the berries.
- Add orange zest and juice to the sauce pan and bring the mixture to a simmer over medium high heat, about 2 minutes. Reduce heat to medium and cook until thicken, about 3 more minutes, stirring frequently to avoid burning the cornstarch.
- Set the filling aside to cool.
Make the dough
- Add flour, cocoa powder, sugar and salt in a small bowl and mix thoroughly with a whisk. Then transfer to a food processor fitted with the dough blade.
- Cube the cold butter and add to the flour mixture. Pulse several times until butter is about pea and bean size, variation in size is okay, but no smaller than a pea.
- Turn the food processor to “on” position and drizzle cold water over the dough mixture through the water hole, as soon as the dough starts to pull together turn the food processor off. You may need to stop the food processor in between and get a spatula to get the flour at the bottom to mix up.
- Turn the dough out on the counter or cutting board and shape into a disk. Wrap in plastic and rest in the refrigerator for at least an hour.
Prepare the pie
- Take the pie dough out of the refrigerator and roll out to about ¼” thick. Use extra cocoa powder to keep dough from sticking to the counter and roller. Use a 3" heart shape cookie cutter and cut out 9 hearts.
- Re-roll the scraps to about ⅛” thick and cut out 9 more hearts. One batch of pie dough should be enough for 9 hand pies. Place the pie dough on a parchment lined baking sheet and refrigerate until ready to use.
- Beat an egg with one tablespoon of cream, milk or water to make egg wash.
- Take two pieces of pie dough out of the fridge, one thin one and one thick one. Roll the thicker piece out slightly larger than its original size, about ¼” more on all sides. This piece will be used as the top crust.
- Brush egg wash around the edge of the thinner piece of dough that will be used as the bottom crust, spoon 2 tablespoons of the strawberry filling on top. Cover it with the larger top crust. Press the edges together and seal with a fork. Repeat for the remaining hearts. You can refrigerate the assembled pies while you work on the rest.
- Preheat oven to 400°F, let the pies rest in the freezer (or refrigerator if you don't have space in the freezer) while the oven is preheating.
- Just before baking, brush egg wash generously over the entire surface of the pies. Create steam vents on the top by poking holes with the tip of a paring knife. Sprinkle with turbinado sugar.
- Bake 20 to 22 minutes uncovered.
- Remove from oven and allow to cool to the touch on a wire rack.
Notes
- If at any point, the dough feels too soft, chill it in the refrigerator before continuing to the next step.
- When freezing the pies before baking, it is best to put them on a small baking sheet that fit in your freezer, then transfer them to a larger baking sheet later for baking.
- You can use either natural cocoa powder or dutch processed cocoa powder for the pie crust. However, dutch processed will give a deeper chocolate flavor.
- Use cocoa powder for dusting and rolling to get more uniform surface on the pie crust after baking.
Nutrition
Nutrition information is automatically calculated, so should only be used as an approximation.
 Like this recipe? Rate & comment below!
This post may contain affiliate links. For more details on how we utilize affiliates, ads, and sponsored content, see our full disclosure policy. Thank you for your continued support, which enables us to keep bringing you delicious recipes, at no extra cost to you.


Wow, what a beautiful recipe! From the bottom of my heart, thank you for participating in our V-Day event and driving awareness to C4KC’s mission!
Julie! Thank you for organizing, you’re the best!
Trang, You are wonderful for creating and sharing this lovely recipe for such a worthy cause!
Your Mediavine swag is on the way and should be to you soon. It’s a small token of our appreciation for your time and efforts to wipe out pediatric cancer.
Thank you so much for participating!
— Susannah at Mediavine
Thank you for being a sponsor and supporting this cause! You guys at Mediavine are awesome and your matching donation means so so much!!
You’ve done it again. Your hand pies always look so beautiful
Looks so well-formed and delicious.