
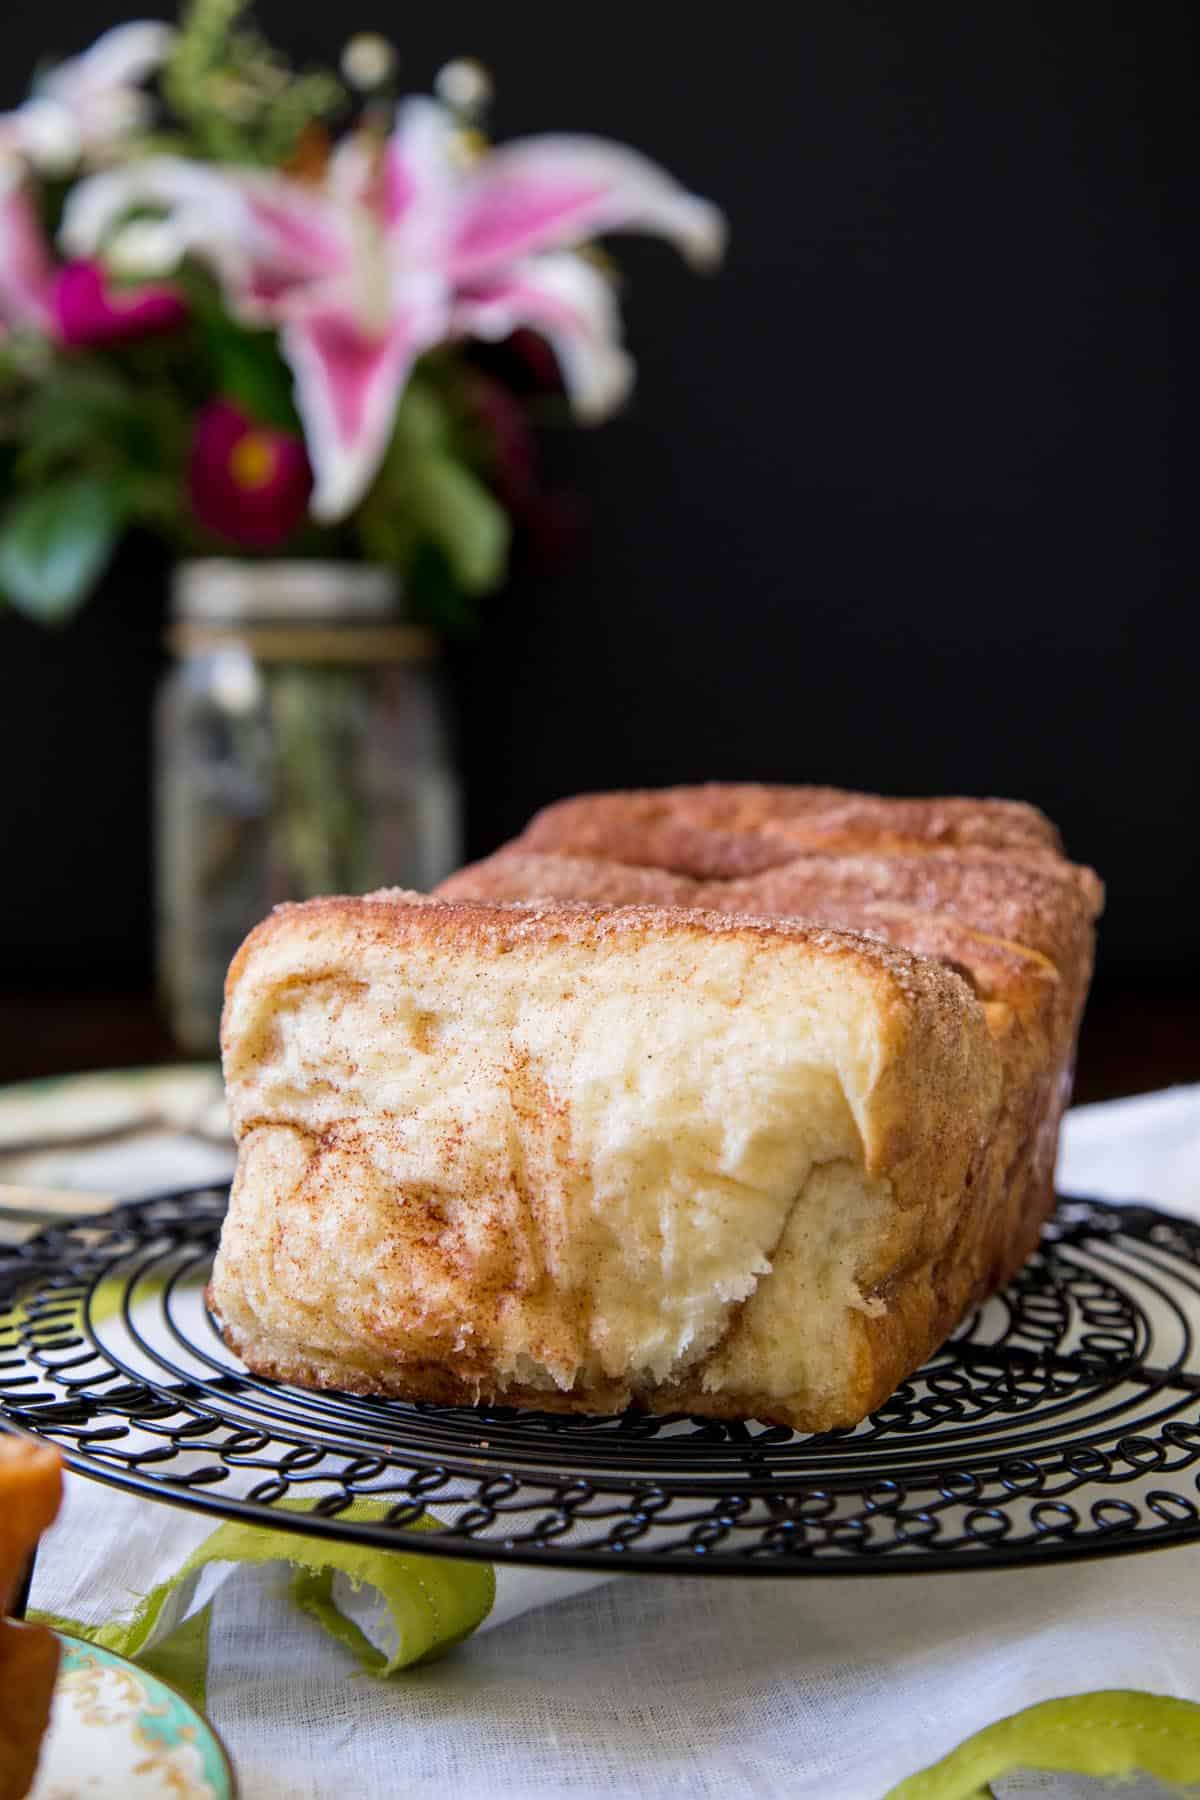
This Cinnamon Pull Apart Bread has layers upon layers of soft and fluffy bread, with a brown butter cinnamon sugar filling sandwiched in between. Serve it with a drizzle of maple glaze for extra sweetness and give yourself something to look forward to each morning.
If you love cinnamon rolls, you will definitely love this cinnamon pull apart bread recipe. It’s great as breakfast with your morning coffee, or as an afternoon snack with tea, and even as a sweet treat after dinner.

Table of Contents
Why you’ll love this recipe
- This bread is very easy to make, no complicated shaping of the bread, just roll it flat, add filling, slice, stack and bake.
- The optional maple glaze allows you to customize the level of sweetness to your taste.
- The bread – while not made with my favorite milk bread dough – is still so soft, fluffy and super fun to pull apart.
- It’s perfect for brunch, snack or dessert!
My favorite way to eat this cinnamon pull apart bread is while it’s still warm drizzle on a maple glaze for extra sweetness. If you prefer this less sweet, you can omit the glaze. Readers have mentioned that it’s still delicious even without it.
Ingredients and Substitutions
As always, you can find the full list of ingredients and quantities in the recipe card at the bottom of this post. Below are some notes and substitution tips:
- Milk – I typically use whole milk when baking. You could also use 2% milk here.
- Butter – Unsalted butter is used in the bread dough. I also use brown butter, made from unsalted butter, in the cinnamon bread filling. You can get away with using salted butter in the bread dough but I wouldn’t recommend using salted butter in the filling, it would make the filling too salty.
- Granulated sugar – is used in the dough, to give the yeast food and make the bread a little sweeter, as well as in the cinnamon bread filling. You can use raw sugar or brown sugar instead.
- Yeast – You can use either active dry yeast or rapid rise instant yeast, the same amount of either type will work. Even with instant yeast, I still like to hydrate it in warm liquid first to ensure the yeast is working.
- Flour – Typically, you want to make bread using bread flour for the higher protein content, which will make your bread chewier. However, I like to keep things simple and use all-purpose flour here.
- Salt – I use kosher salt, if you’re using table salt, only use about two thirds as much.
- Cinnamon – is used in the cinnamon bread filling.
- Maple syrup – I use pure maple syrup for the glaze. I haven’t tried using pancake syrup instead so I can’t recommend it, also I much prefer the taste of pure maple syrup.
- Powdered sugar – is used in the maple glaze. There is no substitution for this but you could try making your own by blending granulated sugar with cornstarch. Add 1 tablespoon of cornstarch for each cup of granulated sugar.
How to make cinnamon pull apart bread
The dough for this cinnamon pull apart bread is very similar to this braided cinnamon bread with berries, except that it has a little bit more butter.
First, make the brown butter
Cook 2 ounces of unsalted butter in a small saucepan over medium heat, stirring constantly, until the butter turns caramel in color and smells nutty. Allow it to cool, and resolidify at room temperature. You’ll want it to be soft and spreadable, so no need to refrigerate it.

Check out my post for brown butter to learn more about how to make it and all the tips and tricks.
If you don’t want to use brown butter, you can simply use softened unsalted butter for the filling. However, brown butter adds such a delicious flavor, so I would definitely recommend making it.
Bloom the yeast
Start by warming the milk and butter in the microwave or in a saucepan over medium heat until the butter melts. Stir in a little bit of sugar to dissolve.
Make sure the mixture cools down to below 110°F before adding the yeast. Note: if the liquid is too hot, it could kill the yeast! Stir and let it bloom for 10-15 minutes, the mixture should puff up.

Prepare the dough
Add part of the flour along with the salt to a stand mixer bowl and stir to distribute, save the remaining flour for when you’re shaping and rolling out the dough. Add the bloomed yeast mixture to the flour mixture and knead with the dough hook attachment on low speed for about 5 minutes until the dough comes together.

Tip: if the dough seems too slack and difficult to handle, you could knead it another 5 minutes to develop more gluten to give it more structure. Or add a little bit more flour to it, but just be mindful not to add too much because you’ll be adding more flour when shaping and rolling too, and too much flour will make the bread drier and harder. We want to keep it soft and fluffy.
First rise
Scrape the dough out of the mixing bowl and shape into a ball on a lightly floured work surface. The dough should be soft but not wet and sticky.
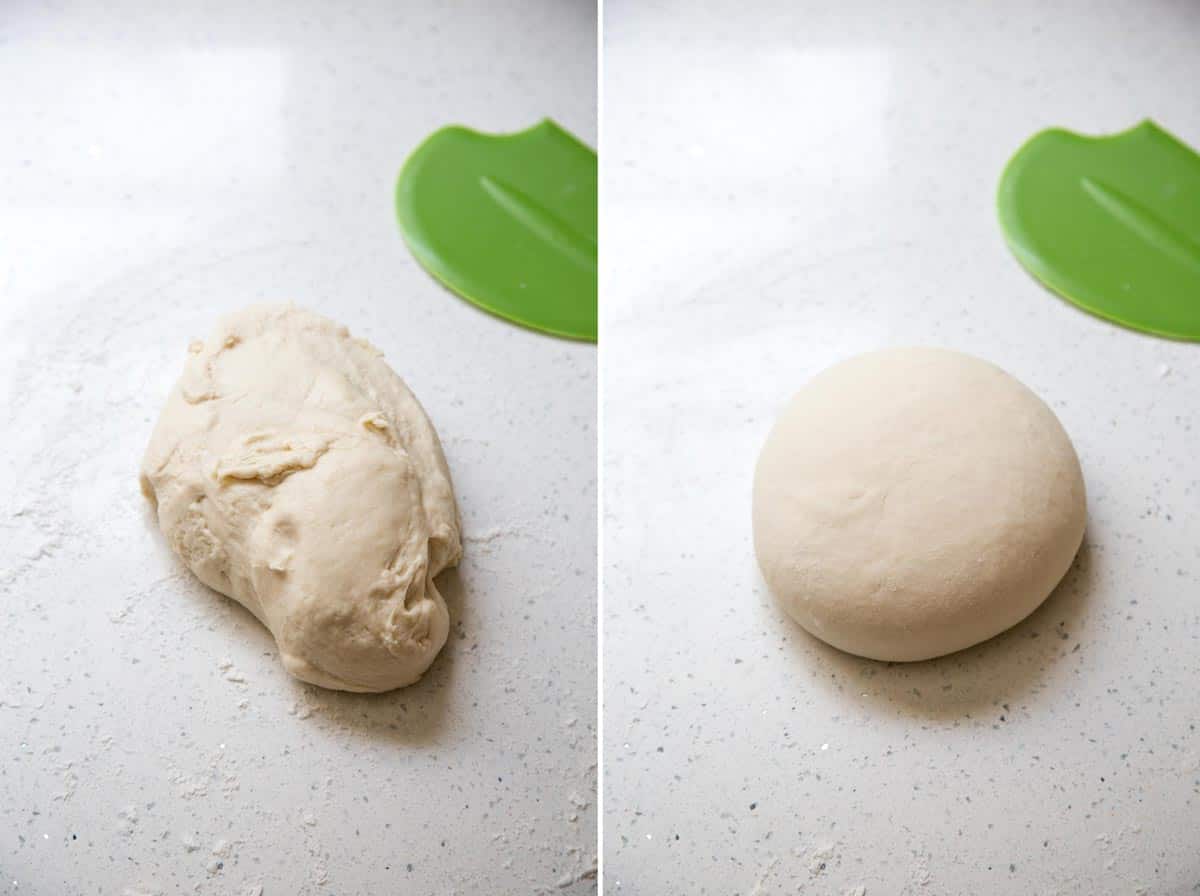
Place the dough ball into an oiled bowl, cover, and let rise in a warm place for 1-1.5 hours until at least double in size.

Tip: you could use oil on your hands and the countertop instead of flour while shaping the dough to help with sticking and also prevent you from adding too much flour which can dry out the bread.
Rolling out the dough
When the dough is ready, roll it out into a rectangle about 12”x18” and spread brown butter over the surface. Mix cinnamon with sugar and sprinkle it all over the dough, spread and tap the sugar down to adhere it to the dough.

Use a pizza cutter to slice the bread into smaller pieces. I cut 3 rows vertically and 6 rows horizontally for 18 pieces. They don’t need to be the exact size. Stack them and fit them all into a buttered and lined loaf pan.

Tip: Line your pan with a long piece of parchment paper so that it hangs over the sides. The excess will act as handles for you to pull the bread out with ease after baking.
Second rise and bake
When you’re stacking the pieces of bread together, some of the cinnamon sugar will fall out. Just scoop it up with a bench scraper and sprinkle it on top of the bread slices once you have them all in the loaf pan.

Let it rise for another 30 minutes to 1 hour while you preheat the oven.
Bake the bread
Typically before you bake, you’ll want to brush a little egg wash on top of the bread to get a golden brown crust. However, for this cinnamon pull apart bread, you don’t need any egg wash because the slices of dough are all covered in cinnamon sugar.
Simply bake the bread at 350°F until you can see that the top is golden brown, this will take about 40 minutes.

Make maple glaze
Whisk together maple syrup and powdered sugar to make a maple glaze to drizzle over the warm bread for serving.

This maple glaze is optional, so if you prefer a less sweet treat, you can omit it all together.
Variations
It’s so easy to modify this recipe to add different flavors:
- Mix the sugar for the filling with citrus zest like lemon, orange, lime for a refreshing flavor.
- Ground up freeze dried fruits like strawberry, raspberry, blueberry and mix it with the sugar for a fruity filling.
- You could also add dried fruits like raisins, dried figs, dried blueberries in between the bread layer.
Baker’s Tips
- Always check that your yeast is working properly before continuing with the recipe to ensure success. If the yeast mixture doesn’t puff up when bloomed, it is best to start over. Otherwise, your dough will not rise.
- Make sure you’re blooming the yeast in temperature 110°F or cooler. If the liquid is hotter than this, you will kill the yeast.
- Rising time can vary, depending on the environment: temperature, humidity, barometric pressure. The dough will rise faster in warmer weather compared to colder weather, in higher altitude compared to lower altitude, etc.
- If at first, the dough seems too slack after 5 minutes of kneading, instead of adding more flour, try to knead the dough another 5 or 10 minutes to develop more gluten. This will give the dough more structure and should make it easier to handle. But remember that more gluten will make the bread chewier, if you want softer bread, knead only as much as necessary.
- Using oil on your hands and the countertop when shaping and rolling the dough can prevent you from adding too much flour and risking drying out the bread, making it too hard.
- Whenever making bread, you have to be mindful not to let the dough over-proof, especially during the second rise, because over-proofed dough will deflate and your bread won’t come out soft and fluffy.
FAQs
Is this bread the same as monkey bread?
This cinnamon pull apart bread is very similar to but not the same as monkey bread. Monkey bread is typically made from dough balls, dipped in butter, rolled in cinnamon sugar, and baked in a bundt pan.
Whereas this bread is made from slices of dough stacked on top of each other with cinnamon sugar in between the layers and baked in a loaf pan.
However, you can definitely turn this recipe into monkey bread, even without a bundt pan, if you wanted to. Instead of rolling the dough out into a rectangle, simply divide it into small balls, dip them in the brown butter and roll them in the cinnamon sugar mixture. Place them in the loaf pan and bake as usual.
Can I make the dough the night before?
Yes, there are two ways you can make this bread ahead.
- You can refrigerate the dough during the first rise and finish the remaining steps the next morning.
- Or you can finish the first rise, roll it out, slice and stack it into the loaf pan, then refrigerate the dough, finish the second rise in the morning and bake.
Here are some tips to keep in mind:
- If you refrigerate the dough during the first rise and it has doubled in size by the next morning, you can roll it out before it comes to room temperature, cold dough is actually easier to work with. But if it hasn’t doubled in size, you’ll need to let it come to room temperature and finish the first rise before working with it.
- If you refrigerate the dough during the second rise, you’ll need to let it come to room temperature in the morning and finish rising before baking.
- The cinnamon sugar filling will melt when refrigerated so when you bake the bread, you’ll end up with a caramelized crust at the bottom. Lining the pan here will make it a lot easier to remove the bread once baked.
- To speed up the second rise, you can make a proofing oven by placing the bread in your oven middle rack and adding boiling water to a tray placed underneath. The steam will create a warm environment allowing your bread to come to room temperature and rise quicker.
How do I serve this bread?
Simply pull this bread apart to serve with a drizzle of maple glaze. You can add the maple glaze on top of the whole loaf or serve it on the side. Have it for breakfast with an ice-cold Vietnamese coffee or as an afternoon snack with a warm cup of Matcha tea latte, or any time of the day!
Storage
- Room temperature: this bread will last for 3 days at room temperature. You can leave it in the loaf pan and cover tightly with plastic wrap or transfer it to an airtight container.
- Refrigerator: you can keep this bread in the fridge for up to a week. Warm a portion up in the microwave for 30 seconds to 1 minute before serving.
- Freezer: you can freeze this bread for up to 3 months. Thaw and warm the bread in the microwave before serving.

More treats with cinnamon
Hungry for more?
Cinnamon Pull Apart Bread

Equipment
Ingredients
Bread dough
- 1 cup whole milk, 240 g
- 2 oz unsalted butter, 56 g
- 2 teaspoon active dry yeast, 8 g
- ¼ cup granulated sugar, 45 g, divided
- ½ teaspoon kosher salt
- 2 ½ cup all-purpose flour, 325 g, reserve ¼ cup for rolling
Cinnamon filling
- 2 oz unsalted butter, 57 g, browned
- ½ cup granulated sugar, 90 g
- 2 teaspoon cinnamon, 5 g
Maple Glaze (optional)
- ¼ cup pure maple syrup, 69 g
- ½ cup powder sugar, 50 g
Instructions
- First, brown the butter for the filling: heat 2 oz of unsalted butter in a small saucepan over medium heat. It will bubble rapidly as the water boils off. Once the bubbles start to subside, whisk constantly to prevent the milk solids from burning. The butter will start to turn a caramel color and smell nutty. Turn the heat off at this point and allow it to cool.
- Make the bread dough: add milk and 2 oz of unsalted butter in a heat proof bowl and microwave for 1 minute, and longer if necessary. Stir to dissolve the butter and check the temperature with a thermometer to ensure it is below 110°F. Let the mixture cool to below 110°F if necessary.
- Add a teaspoon of sugar to the warm milk mixture, mix to dissolve. Sprinkle the active dry yeast over the milk and stir to submerge all the yeast. Let it bloom for about 10 – 15 minutes; the mixture should puff up.
- In the bowl of your stand mixer, add the remaining sugar, 2 ¼ cup of flour and salt, mix with a whisk to evenly distribute.
- Add the bloomed yeast mixture to the flour mixture. Use the dough hook to knead on low speed for 5 minutes, and longer if necessary. The dough should be soft but not too sticky.
- Scrape the dough out onto a floured countertop, shape the dough into a ball.
- Place dough into an oiled glass bowl, cover with plastic wrap and let rise in a warm spot for 1 – 1.5 hours until at least double in size.
- When the dough is ready, scrape it out of the bowl onto a floured countertop. Deflate and roll the dough out into a rectangle about 12”x18”.
- Brush the cooled brown butter over the surface of the dough. Mix ½ cup of granulated sugar with 2 teaspoons of cinnamon, sprinkle the cinnamon sugar on top and lightly press it down to adhere to the bread.
- Use a pizza cutter to cut the bread into 6 rows horizontally and 3 rows vertically, this yields 18 pieces. Don’t worry if they aren’t all the same size. Stack them one on top of the other and place into a buttered and lined loaf pan. Scoop up any cinnamon sugar that has fallen out on the counter and sprinkle it on top of the bread slices in the loaf pan.
- Allow the loaf to rise for 30 minutes to an hour while preheating the oven to 350°F.
- Bake in the middle of the oven for 40 minutes until golden brown and a skewer inserted into the middle comes out clean.
- Remove from the oven and let cool on a wire rack.
- Make the maple glaze: whisk together maple syrup and powdered sugar. Drizzle over bread before serving.
Notes
- Always check that your yeast is working properly before continuing with the recipe to ensure success. If the yeast doesn’t puff up when bloomed in warm liquid, it is best to start over. Otherwise, your dough will not rise.
- Rising time can vary, depending on the environment: temperature, humidity, barometric pressure. The dough will rise faster in warmer weather compared to colder weather, in higher altitude compared to lower altitude, etc.
- Using oil to shape the dough into a ball will help with sticking and prevent you from adding too much extra flour to the dough.
- When lining the loaf pan, use a long piece of parchment paper so you can leave the sides hanging out, as shown in the post process photo. These will become handles later to help you lift the bread out of the pan very easily.
- When microwaving milk, make sure to watch it so it doesn’t boil over inside the microwave.
Nutrition
Nutrition information is automatically calculated, so should only be used as an approximation.
 Like this recipe? Rate & comment below!
This post may contain affiliate links. For more details on how we utilize affiliates, ads, and sponsored content, see our full disclosure policy. Thank you for your continued support, which enables us to keep bringing you delicious recipes, at no extra cost to you.


I’m not sure about the instructions for cutting the dough, as this ends up giving you way too many pieces that can fit in the loaf pan. Your photo above pictures 13-14 slices not 18-24. I ended up having to arrange some pieces horizontally next to the main row to fit all the pieces into the pan. This didn’t really end up mattering since this was SO DELICIOUS. The maple glaze was a bit too sweet for me so we ended up only putting a few drops of it on top, but if you ask me you really don’t need it. This was such a tasty treat after a long, stressful week. The instructions were very easy to follow and you end up with a finished product that not only tastes like bakery quality but also leaves you feeling like the quite the accomplished baker! Thank you for sharing.
Hey Jessica, thank you so much for trying out the recipe and taking the time to leave a comment. I appreciate all the details and helpful tips you left!
Amazing recipe! No need to add any extra flour for anyone wondering. Just keep kneading, if needed, take a 5 minute break to let the gluten relax and develop, then get back to kneading
You might consider tagging recipes without eggs as #eggfree on social media for us people with allergies like me!!!! So super excited looks YUM!!!!
Thanks for the suggestion Lea! Will try to remember 🙂
Wow! you used to work in a cinnamon roll shop??? This looks absolutely divine. Lucky it’s a pull apart and I won’t be stuck to just one slice 🙂
Yes!! That’s my “professional” baking experience hahaha It was a lot of hard work but so much fun rolling out dough everyday. One of my favorite jobs while I was in school 🙂
Thank you for this site. Your efforts and the results are very much enjoyed and appreciated. Everything looks so delicious.