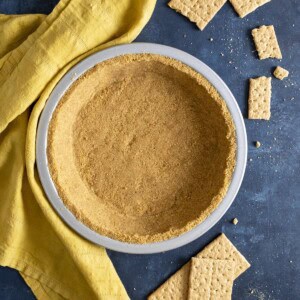
Graham cracker pie crust is a classic cookie crust that’s super easy to make and extremely versatile. You can use it as a no-bake pie crust or bake it for just 15 minutes for a delicious buttery crispy pie crust to add a little crunch to any pie.

If you have always been intimidated by a traditional pie crust recipe, this Graham cracker crust recipe will put your mind at ease. I will show you just how easy it is to make this pie crust using a food processor or even by hand.
While you can easily pick up a premade Graham cracker crust at the grocery store, this homemade version, made with real butter, will taste so much better, guaranteed! I promise you won’t want to get store bought crust ever again.
Table of Contents
Why you’ll love this recipe
- This Graham cracker crust recipe requires just 3 basic ingredients.
- And it takes about 5 minutes to make.
- It’s perfect for both baked and no-bake recipes.
- It’s versatile and can be paired with pies, tarts, cheesecakes, bars, etc.
Ingredients and substitutions
As always, you’ll find the complete list of ingredients and quantities in the recipe card at the end of this post. Below are some notes and substitution tips:

- Graham crackers – I use Honey Maid Graham crackers for this recipe. You can also use cinnamon Graham crackers, Teddy Grahams or Bunny Grahams for more flavor variety. Digestive biscuits, Biscoff cookies, vanilla wafers are also a good substitute if Graham crackers aren’t available.
- Salt – I use just a small amount of salt to add a little complexity to the flavor.
- Butter – I use unsalted butter since I think salted butter may make the pie crust too salty.
Optional ingredient – Sugar – since Graham cracker is not that sweet, the crust will not be as sweet as a Biscoff cookie crust or a vanilla wafer cookie crust, it could use a little additional sugar if you like your crust a little sweeter. Add about 2 tablespoons of sugar to the food processor when you process the crackers into crumbs. I like to use brown sugar for extra flavor, you could use granulated sugar or vanilla sugar if you have that on hand.
Tools you’ll need
I used a food processor to make this Graham cracker pie crust but you can certainly make it by hand. You just need to make sure to crush or chop the crackers into very fine crumbs another way.
You’ll also need a pie or tart pan to form the pie crust in. You could also use a springform cake pan if you’re making cheesecake or a square baking pan for things like lemon bars and pumpkin bars.
How to make Graham cracker pie crust
The following instructions, step-by-step photos, and tips are here to help you visualize how to make the recipe. You can always skip straight to the printable recipe card at the end of this post.
Break up 14 full sheets of Graham crackers, and add everything to the food processor along with salt. Process everything until the crackers become fine crumbs.

Tip: you may need to stop the food processor a few times to make sure some bigger pieces get chopped up properly.
Drizzle in melted butter while the food processor is running and process until the butter is distributed and the crumbs start to clump together. Test by pressing a handful of crumbs together, if it holds, it’s ready.

Tip: you may need to stop the food processor to scrape the side and bottom to get everything to mix more evenly.
Turn the mixture out into your pie dish, tart pan or springform pan, ect. Press into an even layer on the bottom and up the sides of your pan to form the crust.

At this point, you can either let it set up in the refrigerator or freezer if you’re using it as a no-bake pie crust. Or bake it for a crunchy toasty crust.
Make it by hand
If you don’t have a food processor, you can still make this recipe by hand with just a little bit of manual labor.
First, you want to chop the Graham crackers or crush them into very fine crumbs. The best way to do this would be to put the crackers into a ziploc bag and break them up with a rolling pin and then pound them into fine crumbs, larger pieces will not hold together well.
Next, transfer your crumbs into a mixing bowl, mix in the salt and drizzle melted butter over it. Mix it with a fork until the mixture resembles wet sand.

At this point, you can form the pie crust as instructed.
To bake or not to bake
There are two ways to use this Graham cracker pie crust:
- Chill it for no-bake recipes.
- Bake it for a crunchier and sturdier crust. This can be used with either baked or no-bake fillings.
Chilling
If you’re planning to use this crust for no-bake pies and tarts, and you don’t want to bake it, simply chill it in the refrigerator for an hour or freeze it for 15 minutes before adding your filling.
No-bake Graham cracker crust is held together by the solidified butter, so you’ll want to serve it chilled or frozen to avoid the crust falling apart. This is best for recipes that should be served cold.
Baking
If you want a crispier crust with a toasty flavor, you can blind bake the crust and allow it to cool before adding your no bake filling.
To blind bake: line the crust with parchment paper and fill it with dry bean (or pie weight) and bake the crust for 15 minutes at 375°F.

For treats like cheesecakes, chess pie, and bars, it is best to par bake this crust first to give it a little bit of structure before adding the filling and continue baking according to the recipes.
Variations
- Replace a few tablespoons of the Graham cracker crumbs with finely chopped nuts like walnuts, pecans, or pistachios for a nutty crust.
- Add spices like cinnamon, nutmeg, apple pie spice or pumpkin pie spice to add warmth and Fall flavors making this crust a good choice for apple pear pie or pumpkin pie.
More baker’s tips
- If you have a blender but not a food processor, you can grind your Graham crackers into fine crumbs using the blender. And then continue mixing it with melted butter in a mixing bowl.
- It helps to use something with a flat bottom like a measuring cup to press the crust into an even layer.
- Make sure to press the crumbs tightly into the pan to get a sturdy crust and avoid the crust from falling apart when you cut into it.
- This recipe will be enough to fill a 9” pie plate, an 8” or 9” springform pan for cheesecake, an 8” square baking pan or an 8” tart pan to make a thicker crust.
Storage
If not stored properly, Graham cracker crust can go stale. Unbaked crust stored in the refrigerator will last for up to 3 days and in the freezer for 3 to 6 months.
You can also store baked crust at room temperature for up to 3 days, in the refrigerator for up to a week and in the freezer for 3 to 6 months.
Make sure to wrap the crust well to prevent it from absorbing odor from other food when storing in the fridge and freezer.

FAQs
Yes. I gave instructions/tips on how to make it by hand in the section above or you can refer to the recipe card at the bottom of this post.
Absolutely! You can prepare this Graham cracker pie crust a couple of days ahead. Store baked or unbaked crust in the refrigerator until you are ready to fill it or bake it.
The no-bake crust tends to get a little soggy when paired with a moist cream filling, like a banana cream pie or a blueberry cream cheese pie for example. One way to keep it crunchier and crispier is to bake the crust fully before filling it. You can take it even one step further by brushing the crust with some beaten egg white before baking to create a barrier keeping the moisture in the filling from seeping into the crust.
When you bake any pie crust, expect some shrinking to occur. But you can keep it to a minimum by using pie weights or dry beans like I do. The beans will help keep the side from sliding down when you’re baking the crust. After you take it out of the oven, keep the weights or beans in the pie crust while it’s cooling and setting unless you will be adding a filling and bake again right away.
You don’t need to thaw before using. If you’re planning to use it in a no-bake recipe, simply add the filling and chill in the fridge before serving. If you’re using it in a baking recipe, you can blind bake directly from the freezer.

More pie crust recipes
Hungry for more?
Graham cracker pie crust
Equipment
Ingredients
- 14 full-sheet of Graham crackers, about 2 cup ground, 213 g
- ⅛ teaspoon kosher salt
- 3 oz unsalted butter, melted, 85 g
Instructions
Using a food processor
- Break Graham crackers into small pieces and ground in a food processor until fine crumbs form.
- Melt the butter in the microwave for about 30 – 45 seconds, stir with a fork to dissolve any remaining solid butter. Drizzle melted butter over the Graham cracker crumbs while the food processor is running, then process for an additional 10 – 20 seconds until the mixture is the texture of wet sand.
Make it by hand
- Put the crackers into a ziploc bag, break them up with a rolling pin and pound them into fine crumbs.
- Transfer crumbs to a medium mixing bowl and stir in the salt. Drizzle melted butter over it and mix it with a fork until the mixture resembles wet sand.
Form the pie crust
- Turn the mixture out into a tart pan or pie dish and press into the bottom and sides of the pan to form a crust.
- For a no-bake recipe, wrap well and freeze (or refrigerate) until ready to use.
- For a baked recipe or simply for a crunchier crust, line the crust with parchment paper, fill with pie weights or dry beans, and blind bake or par-bake the crust at 375°F for 15 minutes.
Notes
- Whether you’re processing the Graham crackers with a food processor or blender, or by hand, make sure to process them into fine crumbs, larger pieces will not hold together as well.
- It helps to use something with a flat bottom like a measuring cup to press the crust into an even layer.
- Make sure to press firmly to prevent the crust from falling apart when cut.
- This recipe will be enough to fill a 9” pie plate, an 8” or 9” springform pan for cheesecake, an 8” square baking pan or an 8” tart pan to make a thicker crust.
Nutrition
Nutrition information is automatically calculated, so should only be used as an approximation.
 Like this recipe? Rate & comment below!
This post may contain affiliate links. For more details on how we utilize affiliates, ads, and sponsored content, see our full disclosure policy. Thank you for your continued support, which enables us to keep bringing you delicious recipes, at no extra cost to you.