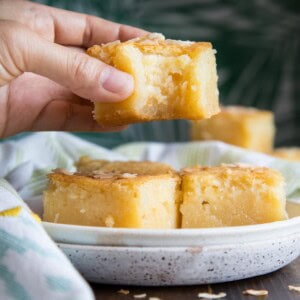
Soft and chewy Hawaiian Butter Mochi is an iconic Hawaiian treat made with sweet rice flour, which also happens to be gluten free. It will transport you to the island of Hawaii in just one bite!

Is it weird to describe a dessert as satisfyingly squishy? Biting into this butter mochi is like hugging one of my daughter’s squishmallows! It’s rich, chewy, coconut-y, comforting and just delightful overall. Give it a try, I promise you it will be a big hit with your family!
My first exposure to Hawaiian butter mochi was actually well before I ever travelled to Hawaii via these coconut mochi muffins that my husband’s aunt used to make, I just didn’t know it then! But after traveling to Maui, I have to say I’m totally hooked, I need to have them in every flavor: chocolate brownie mochi (or Brochi), mini Matcha green tea mochi and guava mochi. I also turned cornbread into mochi and banana bread into mochi too!
Table of Contents
Helpful tools
The best thing about this recipe is that you don’t need any special tools at all to make it! All you need are a really large mixing bowl and your whisk to mix the batter, along with a 9″x13″ baking pan to bake it in. But a stand mixer would be very useful due to the large volume of the batter.
Ingredients and substitutions
As always, you’ll find the complete list of ingredients and quantities in the recipe card at the end of this post. Below are some notes and substitution tips:

- Mochiko – is one of the main ingredients. It is a sweet rice flour, also known as glutinous rice flour. This type of rice has a shorter grain and is very sticky when cooked. You need to purchase the correct type of rice flour for this recipe to work. I typically use Koda Farms Mochiko, as pictured. You should be able to find this at most Asian grocery stores. My local Stater Bros carries it in the Asian or International aisle. I expect the recipe to work fine with other brand of sweet rice flour as well. But I must stress that you need to buy Mochiko or sweet rice flour, not regular rice flour. Regular rice is not as sticky as sweet rice and the texture will not be the same. And absolutely DO NOT substitute regular flour here.
- Coconut cream or milk – I used unsweetened canned coconut cream and sometimes just unsweetened canned coconut milk. The coconut cream has slightly higher fat content. Before I could only find coconut cream at Sprouts but I notice recently they have been easier to find. Any brand will work, you will find a variety at Asian grocery stores and pretty much any supermarket nowadays. But I will note that you need to use the canned coconut milk and not the refrigerated carton coconut milk, those are lighter and more watery. For the best traditional butter mochi, definitely stick to coconut cream or milk. But half and half (or unsweetened coffee cream) is a good substitute due to the similar fat content.
- Evaporated milk – adds another layer of creamy rich taste to this butter mochi. You can make your own evaporated milk by simmering whole milk until the volume is reduced by half or use a mixture of whole milk + half and half (3:1) or whole milk + cream (7:1).
- Unsalted butter – no additional salt is called for in this recipe so I don’t recommend substituting salted butter.
- Sugar – granulated sugar works fine for this recipe but if you want to add a little bit more flavor depth, you can use brown sugar.
- Eggs – we are using lots of eggs in this recipe to bind the ingredients and to add richness also.
- Pure vanilla extract – for the best flavor, avoid imitation vanilla flavoring. While the dominant flavor is coconut here, I think adding a little bit of vanilla adds depth and complexity.
- Baking powder – baking soda is not a substitution for baking powder. Baking soda needs an acidic environment to work and this recipe does not provide that. You must use baking powder.
- Coconut – may or may not be a traditional ingredient in Hawaiian butter mochi, but I like the addition for extra coconut flavor and another layer of texture. If you prefer a completely smooth batter, you can omit these. You can also us different mix-in like crushed macadamia nuts for example.
How to make Hawaiian butter mochi
The following instructions, step-by-step photos, and tips are here to help you visualize how to make the recipe. You can always skip straight to the printable recipe card at the end of this post.
Mix together the melted butter and sugar in a large mixing bowl.

Beat in the eggs one at a time, and then add the rest of the wet ingredients: coconut milk, evaporated milk, and vanilla.

Tip: If you’re using a stand mixer, you can add all the wet ingredients altogether at the same time. But when you’re incorporating the ingredients by hand, it’s easier to do it one at a time.
Now add the dry ingredients: mochiko and baking powder. Stir until completely smooth and fold in the coconut.

Transfer to a buttered baking pan and bake until golden brown and cooked through.

More baker’s tips
- This recipe is gluten free since there is no wheat flour in it. Even though the rice flour is called “glutinous rice flour”, there is no gluten in it.
- You can bake this recipe in two 8”x8” baking pans. I have not done this myself but some readers have. The baking time will need to be shortened, I suggest checking around 25 – 30 minutes for doneness and continue baking as needed.
- The baking time can vary from 50 minutes up to 75 minutes depending on your oven temperature. If the top starts to get too brown but the inside is not done, tent it with a large piece of foil to keep the top from burning.
- This recipe will make at least 24 servings and possibly more if you cut them smaller. For a smaller batch, try these mini coconut mochi muffins, they are also a little bit lighter as well.
Storage
Butter mochi tastes best when fresh, especially because this type of treat can lose its bounciness when it is days old. But reheating it can make it tender and moist again.
It will keep at room temperature for a couple of days. Because it is a very moist treat, if kept out too long it can go bad, especially in very warm weather. In this case, it is best to refrigerate leftovers, it will last up to 2 weeks.
Freezing instructions
You can definitely freeze these to store them even longer. I recommend wrap individual portion well in plastic and/or foil, then place them in a freezer bag and freeze for up to 3 months. Thaw completely at room temperature before serving.
Reheating instructions
Refrigerated and frozen butter mochi will lose their bounciness once thawed. I highly recommend warming them up in the microwave for about 20 seconds to soften them. To microwave, make sure your mochi wrapped in plastic or a damp paper towel to keep it from drying out.

FAQs
Can I use shiratamako instead of mochiko?
Shiratamako is another type of sweet rice flour, but it comes in larger lumps and not as a fine powder like Mochiko. If you have shiratamako handy, I expect you can use it in place of Mochiko, after you break up the lumps.
However, it’s actually a lot more expensive due to the difference in processing method, so you better save it for making other types of more refined Japanese mochi confections. Nami from Just One Cookbook has a detailed post about Shiratamako and how it differs from Mochiko if you’re interested.
What is Hawaiian Butter Mochi?
Hawaiian Butter Mochi is a local Hawaiian treat made with sweet rice flour, also called glutinous rice flour, along with butter, eggs, coconut milk, evaporated milk, and a few other typical ingredients such as sugar, baking powder and vanilla extract. Coconut flakes or other fillings can be added to create different variations.
The butter mochi is baked like you would a sheet cake in a 9”x13” baking pan, and then divided into smaller portions for serving. You can consider it a type of cake, but locals don’t call it a Mochi cake, simply butter mochi or Hawaiian butter mochi will do.
Is this the same as Japanese Mochi?
NO. Japanese mochi is typically made with steamed sweet rice, pounded until smooth and stretchy, then it is formed into balls or smaller portions. Japanese mochi can be plain, or filled with sweet red bean paste, or infused with other flavors. But this type of mochi is not baked and is completely different from Hawaiian butter mochi.
Did you know there is also a version of Japanese Butter Mochi?
Fun fact: there is also a version of Japanese Butter Mochi, only made in the Akita prefecture in northern Japan. This version of Akita butter mochi is also made with pounded steamed sweet rice and then melted butter, sugar and egg yolks are kneaded into the already smooth and stretchy mochi.
Again, this type of mochi is not baked, and resembles the traditional Japanese mochi more than the Hawaiian mochi due to the way it is made. I learned about Japanese butter mochi via TabiEats, one of my favorite Youtubers for all things Japanese food and travel.

Island inspired recipes you’ll love
- Banana Bread French Toast
- Pani Popo (Samoan Coconut Buns)
- Surfer Granola with macadamia nuts, coconut & banana
- Tropical Cinnamon Buns
- Macadamia Coconut Coffee Chocolate Chip Cookies
Hungry for more?
Hawaiian Butter Mochi
Ingredients
- 4 oz unsalted butter, melted & cooled slightly
- 2 cup granulated sugar, 400 g
- 1 teaspoon pure vanilla extract
- 4 large eggs
- 1 can evaporated milk, 12 oz
- 1 can unsweetened coconut cream, or coconut milk, 13.5 oz
- 1 box of Mochiko, 16 oz
- 2 teaspoon baking powder
- 1 cup unsweetened shredded coconut, 80 g
- Extra butter for pan
Instructions
- Preheat the oven to 350°F.
- Brush some melted butter all over a 9”x13” baking pan and set aside.
- Add melted butter and sugar to a large mixing bowl (or the stand mixer bowl) and mix well to combine.
- Add vanilla, eggs, evaporated milk, coconut cream and beat until smooth.
- Stir in mochiko and baking powder and mix until completely smooth.
- Fold in the shredded coconut.
- Pour the mixture into the prepared pan and bake for about 50 minutes (or longer if necessary) until the top is golden brown and a toothpick inserted in the middle comes out mostly clean with just a few crumbs attached.
- Allow to cool completely before cutting and serving.
- Sprinkle toasted coconut flakes over the top if desired.
Video
Notes
- This recipe is gluten free.
- There is no substitution for mochiko (sweet rice flour)
- Be sure to use canned coconut cream or canned coconut milk and not the carton variety.
- The baking time can vary from 50 minutes up to 75 minutes depending on your oven temperature. If the top starts to get too brown but the inside is not done, tent it with a large piece of foil to keep the top from burning.
- You can bake this recipe in two 8”x8” baking pans. The baking time will need to be shortened, check around 25 – 30 minutes for doneness and continue baking as needed.
- This recipe will make at least 24 servings and possibly more if you cut them smaller.
- Refer to the post for more troubleshooting and substitution tips.
Nutrition
Nutrition information is automatically calculated, so should only be used as an approximation.
 Like this recipe? Rate & comment below!
This post may contain affiliate links. For more details on how we utilize affiliates, ads, and sponsored content, see our full disclosure policy. Thank you for your continued support, which enables us to keep bringing you delicious recipes, at no extra cost to you.


This recipe is on repeat in my house. Reminds of a very special place, Kauai. Thank you so much ❤️
So happy to hear this one is on repeat. I’m glad you found it, thank you for your review! 🙂
This recipe looks delicious and I want to try it out but I have a family member that is lactose intolerant, can I just use extra coconut milk in place of the evaporated milk? I also wanted to try adding some pandan extract! Thank you for your help!
Yes, it should work with all coconut milk. Just keep in mind, you are still using butter as well. If needed, you can probably sub out the butter with coconut oil but it won’t have the same richness and buttery taste like the original recipe. Pandan extract should work here too.
Hi Trang,
I want to make this in mini cupcake pan. How long should I bake it?
I have baked it in a 9×13 pan, and it turned out great. But this time I want to make it in a mini muffin pan to bring to a party. I might have to use two pans.
Thanks.
Hi Lynn, are you talking about 12-muffin standard size muffin pan or 24-muffin mini muffin pan? I think you’ll need at least 2 pans for standard size, try 20-25 minutes for this size. But if you’re talking mini mini size like, see my coconut mochi recipe, I think you’ll make a lot more than just 2 pans, bake time is about 15 mins for the mini ones.
I’m talking about using this recipe with the 24-mini muffin pan.
It’s best to bake it separately rather than put 2 pans in the oven? I don’t know if they will bake evenly if I bake two 24-mini muffin pans at once. What do you think?
I need to bring to a bridal shower next weekend. Thanks.
I would bake one pan at a time. Two pan will crowd the oven and when the hot air can’t circulate, that’s when you have uneven heating and burning. I think you may get more than 48 mini muffins since you don’t want to overfill the cavity and let it spill over when baked. Check out the recipe I linked to you the other day to see how much to fill the mini muffin pan, just 3/4 ways. And don’t use cupcake paper, just brush with butter. A bit more work or you can just bake in the 9×13 pan and precut them into smaller square?
Thanks Trang.
If I bake one pan at a time, it’s ok to put the batter in the fridge while I wait for the first batch to bake?
I know it’s easier just to do in one 9×13 pan. I did that the first time I made this recipe.
But I thought it might be cuter to have them in little mini cupcake forms at the bridal shower.
Thanks for responding to me so promptly.
You don’t need to refrigerate while you wait, just cover the batter and leave it at room temp. If you can’t finish baking within a couple hours then I would refrigerate. I hope everything works out beautifully for the bridal shower. And congrats to the bride to be!
So yummy! The best part is the crunchy top. I omitted the shredded coconut in the batter as I know some people wouldn’t like the texture. I saw some other recipes called for 3 cups of sugar, but 2 was plenty.
I baked a batch and brought it to work. Colleagues loved the treat!
So glad to hear Joyce! Thank you 🙂
This was so good! I made this because my kid is obsessed with mochi, but then we were worried because we only had a can of condensed milk instead of evaporated milk. But it wasn’t too sweet — it was chewy and savory and delicious. YUM.
Thank you for the delicious recipe 🙂
Yay! So happy to hear you enjoyed it 🙂
Hi, Trang. Do you think I can put 2 pans in the oven at the same time? Not sure if you’ve tried that and may have an idea of the adjusted baking time? Thank you so much!
Hi Tracy, I think you left two of the same comments, let me know if you don’t see my answer in the first one.
I love this recipe! I am wondering if you’ve tried to bake 2 or 3 pans in the oven at the same time? 2 pans on the top tier and 1 pan at the bottom tier? Wondering what the baking time would be? Thank you!
Hi Tracy, I don’t recommend doing multiple pans because you can have uneven baking unless you have convection oven. If the two pans fit on one rack, I would do them on one rack in the middle of the oven. But even that you need to be careful because if the two pan fits perfectly and there is no space for air to circulate around the pans from bottom to top you might get uneven baking too!
I love this recipe! I’ve been making it for awhile now and it’s been a big hit every time. Can’t wait to try all the other variations you’ve shared. Thank you for sharing the recipe! This one is definitely a keeper!
Thank you Eny, glad to hear you love this recipe 🙂 One of our favorites as well.