
Making Pie Crust from scratch doesn’t have to be intimidating or complicated. Let me show you 3 different ways to make a super easy and delicious all butter pie crust using whatever kitchen appliance you have or even by hand!
Pie crust is super cheap, and you can easily pick one up in the frozen aisle to save time during a busy season. But making pie crust from scratch is truly an easy task with high reward – this buttery, flaky, slightly sweet all butter pie crust will elevate your pie making for all seasons!

Table of Contents
Why you’ll love this recipe
- Making homemade pie crust means you can control what goes into your recipe, like high quality real butter for the best tasting pie crust.
- You only need 5 simple ingredients for this recipe, if you count water as an ingredient.
- You can make this recipe using a food processor, a stand mixer or even by hand if you don’t have the fancy equipment.
Ingredients and substitutions
As always, you can find the full list of ingredients along with quantities in the recipe card at the end of this post. Below are some notes and substitution tips for the ingredients you’ll need to make a homemade pie crust.
- Flour – I usually use all purpose flour, but you can also use pastry flour for an even more tender crust.
- Granulated Sugar – if you like your crust more savory, you can use less sugar.
- Salt – always add salt to bump up the flavor of your baked goods.
- Butter – use the highest quality butter you can afford for a special occasion, otherwise any brand of butter will work fine and will yield a delicious crust either way.
- Water – you will need about 2 to 3 tablespoons of very cold water to help the dough bind together. But don’t use too much or you will end up with a sticky dough.
Method 1 – using a food processor

- Add flour mixture and cold cubed butter to the bowl of the food processor fitted with the plastic dough blade (Image 1a). Pulse several times until butter is about pea and bean size. Variations in size are okay.
- Turn the food processor to “on” position and drizzle cold water over the dough mixture through the water hole, as soon as the dough starts to pull together, turn the food processor off. (Image 1b)
- Grab a chunk of dough and press it in your hand if it holds, your pie dough is done. (Image 1c)
- Turn the dough out on the counter or cutting board lined with a piece of plastic wrap. (Image 1d)
- Shape into a disk and refrigerate for at least an hour. (Image 1e)
Method 2 – using a stand mixer

- Add flour mixture and cold cubed butter to the bowl of the stand mixer fitted with the paddle attachment (Image 2a). Mix on low until the butter is evenly distributed and isn’t in their original cube shape anymore.
- Drizzle cold water over the dough mixture while the mixer keeps going on low speed (Image 2b), as soon as the dough starts to pull together, turn the mixer off.
- Grab a chunk of dough and press it in your hand if it holds, your pie dough is done. (Image 2c)
- Turn the dough out on the counter or cutting board lined with a piece of plastic wrap. (Image 2d)
- Shape into a disk and refrigerate for at least an hour. (Image 2e)
Method 3 – making pie dough by hand
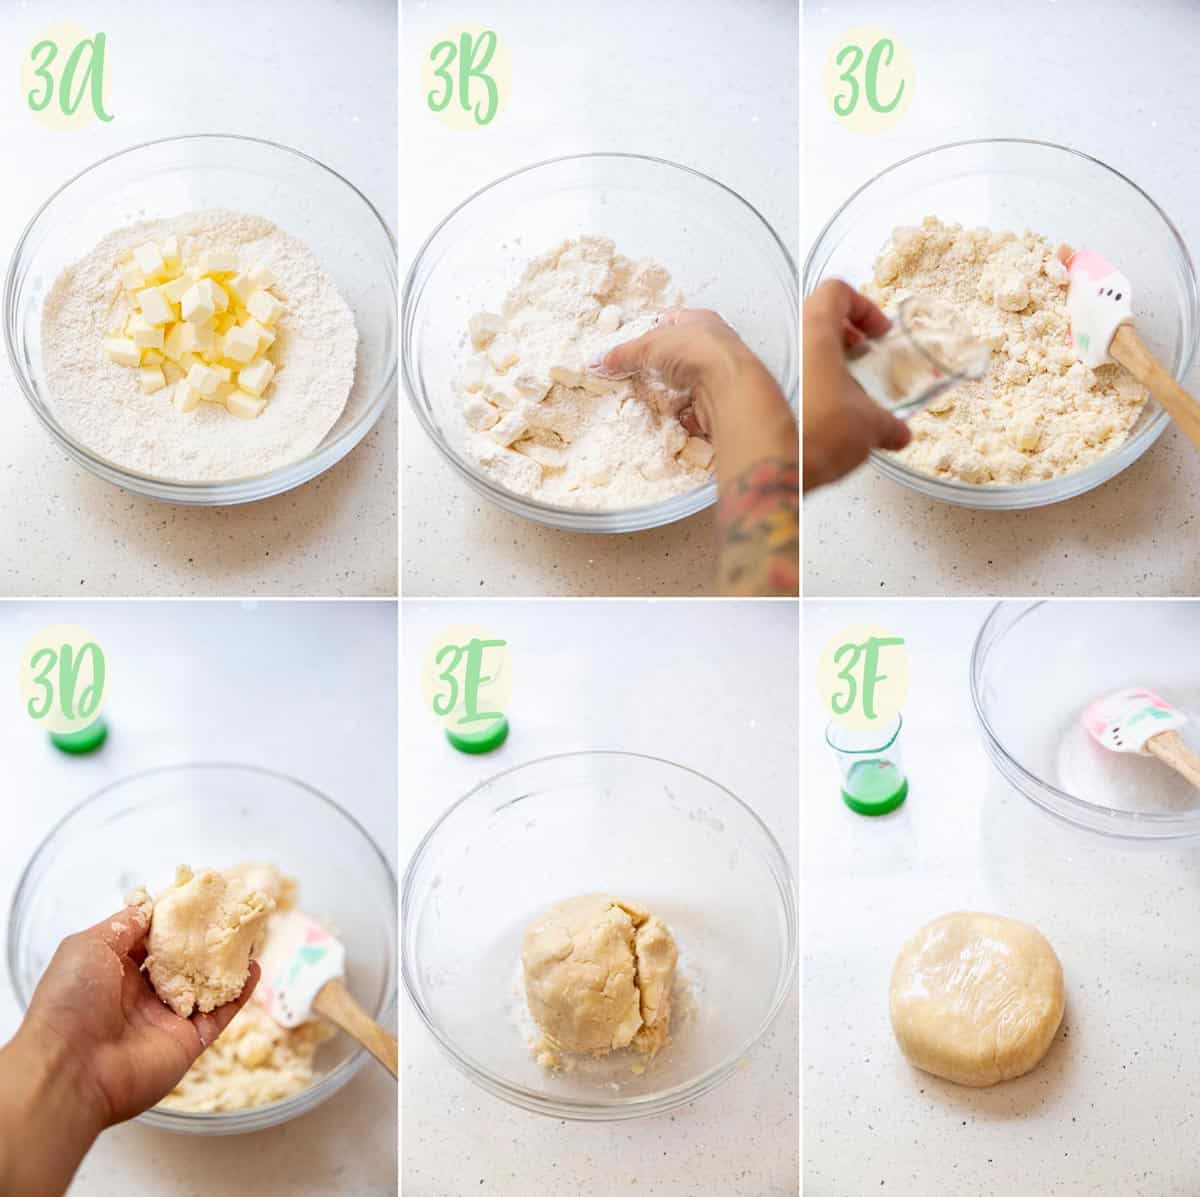
- Add flour mixture and cold cubed butter to a large mixing bowl. (Image 3a)
- Use a pastry blender to cut the butter into the flour mixture or pinch it together with your fingers until none of the butter pieces are larger than pea or lima bean size. (Image 3b)
- Drizzle cold water over the dough mixture and mix with a spatula. (Image 3c)
- Grab a chunk of dough and press it in your hand, if the dough holds it is done. (Image 3d)
- Gather the dough and form a ball in the bowl. (Image 3e)
- Place the dough ball on a piece of square plastic wrap and flatten into a disk. Wrap well and rest in the refrigerator for at least an hour. (Image 3f)
Shaping the pie dough
Once the pie dough has been resting for about an hour, you are ready to roll it out and use it for any recipe that calls for pie dough.

- If you’re baking this in a pie dish, you’ll want to roll it out about 2” larger than your pie dish.
- To transfer the sheet of pie dough onto the pie dish, you’ll want to roll it up onto your rolling pin. For this step, it is useful to have a longer French style rolling pin.
- Place the rolled up pie dough over your pie dish and unroll it to cover the dish.
- Trim some of the excess dough if necessary to create an even edge, leaving just enough to fold under and create a fluted edge. Refrigerate or freeze until ready to use.
Par-baking the crust
If you’re using this pie crust for a custard base pie like this Pumpkin Pie or this S’mores Pie, you’ll need to par-bake the crust so it doesn’t get soggy from the filling.

- To prepare the pie dough for par-baking, use a fork to poke steam vents on the bottom as well as the side.
- Place a large piece of parchment paper over the pie dough, place pie weights on top or pour dry beans on top to fill the whole pie dish. Make sure the parchment is large enough to cover the edges of the crust entirely. Bake at 425°F with pie weights for 25 minutes and an additional 5 minutes without pie weight and parchment paper.
If you’re using this pie crust for a fruity cream pie like this Peaches and Cream Pie or this Strawberry Cream Cheese Pie, or to fill it with a no bake Biscoff pie filling, you can take the baking further to completion, another 5 – 10 minutes until the crust is golden brown.

Baker’s tips
- The amount of water you’ll need may vary between 2 – 3 tablespoons depending on the type of flour you use or even the weather.
- You’ll notice when you use too little water. The pie dough will be too dry, and won’t stick together when you test it by pressing a clump in your hand.
- If you use too much water, the pie dough will be too wet and sticky. So make sure to drizzle just enough water to form clumps of dough that stick together.
- When par-baking, make sure the parchment paper is large enough to cover the entire crust including the edges so the edge doesn’t burn.
- Whether you continue to bake this pie after par-baking or baking it straight with a fruit filling, make sure to use a pie shield to cover the pie edge so it doesn’t burn.
- My favorite pie weights are dry beans. I have been using the exact beans you see in these photos for over 5 years, they last forever!
- Another reason I like using beans is because I can fill them to the top and ensure the side of the pie crust doesn’t collapse while par-baking.
- If you’re freezing pie crust in the dish, I highly recommend using a metal pie dish. Glass and ceramic can crack when going from freezer to oven due to the sudden temperature change.
Storage
Unbaked pie crust, in the disk form or shaped in a pie dish, can be refrigerated for up to a week or frozen for up to 6 months.

Recipes using this all butter pie crust
- Chocolate Chip Cookie Pie
- Pumpkin Hand Pies
- Pie Crust Cookies
- Guava and Cheese Empanadas
- Mini Plum Tart
Hungry for more?
Homemade Pie Crust

Ingredients
- 1 ½ cup all-purpose flour, 200 g
- 2 rounded tablespoon granulated sugar, 31 g
- ¼ rounded teaspoon kosher salt, 2 g
- 5 ounce unsalted butter, cold & cubed, 142 g
- 2 – 3 tablespoon cold water
Instructions
Make the pie dough
- Add flour, sugar and salt in a mixing bowl and mix thoroughly with a whisk. Transfer flour mixture to a food processor fitted with the dough blade, or a stand mixer fitted with the paddle attachment or simply leave it in the bowl if making pie dough by hand.
Using Food Processor
- Add cubed cold butter to the flour mixture. Pulse the food processor several times until butter is about pea and bean size. Variations in size are okay.
- Turn the food processor to “on” position and drizzle cold water over the dough mixture through the water hole, as soon as the dough starts to pull together turn the food processor off. You may need to stop the food processor in between and get a spatula to mix up the flour at the bottom.
- Turn the dough out on the counter or cutting board lined with a piece of plastic wrap, and shape into a disk. Wrap well and rest in the refrigerator for at least an hour.
Using Stand Mixer
- Add cubed cold butter to the flour mixture. Turn the stand mixer on low to beat the butter into the flour. You will see the butter pieces flatten and get smaller. Variations in size are okay.
- Once the butter pieces are no longer in their original cube shape, drizzle cold water over the dough mixture while the mixer keeps going on low speed. Stop the mixer once you see larger clumps of dough start to pull together.
- Turn the dough out on the counter or cutting board lined with a piece of plastic wrap, and shape into a disk. Wrap well and rest in the refrigerator for at least an hour.
By Hand
- Add cubed cold butter to the flour mixture. Use a pastry blender to cut the butter into the flour mixture or pinch it together with your fingers until none of the butter pieces are larger than pea or lima bean size.
- Drizzle cold water over the dough mixture and mix with a spatula. Grab a chunk of dough and press it in your hand, if the dough holds it is done.
- Form a ball in the bowl, place it on a piece of square plastic wrap and flatten into a disk. Wrap well and rest in the refrigerator for at least an hour.
- At this point, you can use the dough as you please for a single crust pie, hand pies, tart, etc. Continue on with the following steps to prepare and par-bake the pie crust to use in recipes with a custard type filling.
Shaping and par-baking
- Take the disk of pie dough out of the fridge and roll into a circle about 2” larger than your pie dish. Use extra flour to keep the dough from sticking to the counter and roller.
- Carefully place the dough over the pie dish, lightly press the dough into the bottom and side of the pie dish, let the excess dough hang over the side.
- Trim some of the excess dough if necessary to create an even edge, leaving just enough to fold under and create a fluted edge.
- Cover the pie dish with plastic wrap and keep refrigerated or freeze for 15 – 30 minutes.
- Once the pie dough has frozen solid, preheat the oven to 425°F.
- Use a fork to poke steam vents on the bottom of the pie dough and on the sides as well.
- Place a large piece of parchment paper over the frozen pie dough, place pie weights on top or pour dry beans on top to fill the whole pie crust. Make sure the parchment is large enough to cover the edges of the crust entirely.
- Bake pie crust for 25 minutes with pie weights or beans, then remove weights and bake another 5 minutes until slightly brown.
- The pie crust can be baked to completion until golden brown, an additional 5 – 10 minutes to be used in pie recipes that don’t require further baking of the filling, such as cream pie.
- Remove from the oven and let cool on a wire rack.
Notes
- The amount of water you’ll need may vary between 2 – 3 tablespoons depending on the type of flour you use or even the weather. Too little water and the pie dough will be too dry, and won’t stick together. Too much water and the pie dough will be too wet and sticky. Drizzle just enough water to form clumps of dough that stick together.
- When par-baking, make sure the parchment paper is large enough to cover the entire crust including the edges so the edge doesn’t burn.
- If you continue to bake this pie with a custard type filling, make sure to use a pie shield to cover the pie edge so it doesn’t burn.
Nutrition
Nutrition information is automatically calculated, so should only be used as an approximation.
 Like this recipe? Rate & comment below!
This post may contain affiliate links. For more details on how we utilize affiliates, ads, and sponsored content, see our full disclosure policy. Thank you for your continued support, which enables us to keep bringing you delicious recipes, at no extra cost to you.


Do you have any tips for keeping the pie crust from shrinking? Also, do you parbake for an apple pie? Excited to try!
You don’t need to par-bake apple pie. Check out my apple pie recipe for tips. Don’t stretch the dough, allow the rolling pin to do its job gently, and resting it before baking will relax it so it doesn’t shrink into itself.
Is 5 ounces of butter equivalent to 10 Tablespoons?
Yes it is.
Great tips and this pie crust looks like it holds its shape perfectly when baked too.
It does, this is my go to every time!
Mornin! Have you tried grating frozen butter instead of cubing? I grate butter for scones and am curious about doing the same for pie crusts. Thanks!
Hi Patti Lynne, I have never used grated butter with pie crust so I can’t tell you how it will turn out. If you do that, I would mix it in with the flour real quick and drizzle water right away, make sure everything is cold so the butter doesn’t incorporate completely into the dough, you want visible butter specs in your pie dough once done. Come back and let us know if you try that method.