
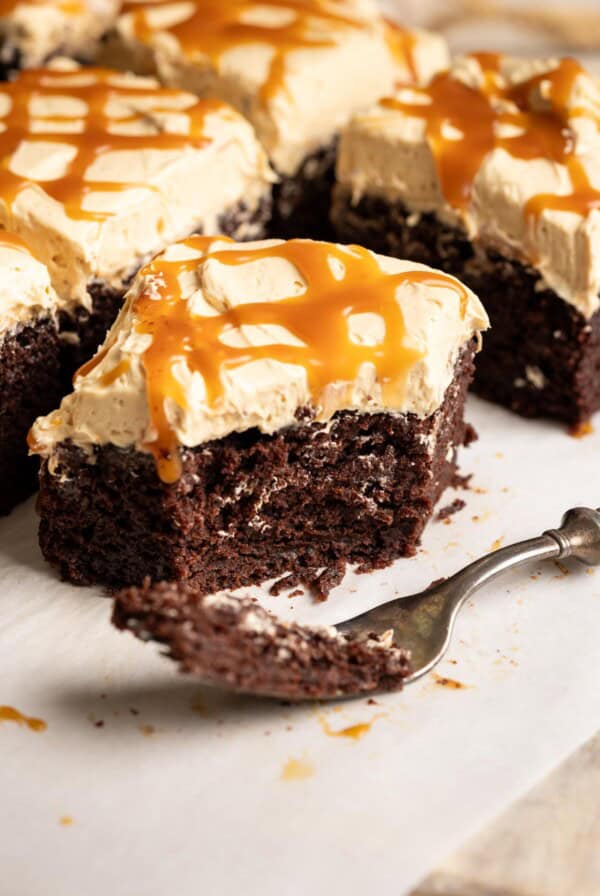
Two layers of rich, moist chocolate cake meet a silky smooth espresso Swiss meringue buttercream in this irresistible Mocha Cake!
If I can only pick two things I can’t live without, they would have to be my morning coffee and my afternoon chocolate. And this Chocolate Mocha Cake combines my two favorite things into the ultimate indulgent treat that I guarantee you won’t be able to live without either.

✨ Trang’s recipe highlights
- TASTE: rich dark chocolate with bold coffee flavor.
- TEXTURE: super soft and moist cake slices wrapped in a silky frosting.
- EASE: the cake is super easy to make while the frosting is a little bit more advanced since it is a Swiss meringue buttercream, but don’t worry, I will walk you through it step-by-step.
- PERFECT FOR: birthday celebrations, Valentine’s and Galentine’s Day.
What you’ll need
Below is a labeled photo of all the ingredients you’ll need to make this cake. Jump to the recipe card for the full list of ingredients with quantities, as usual.

We are using two types of coffee in this mocha cake recipe:
- Strong brewed coffee for the cake batter – this will not be enough to create the mocha flavor, but coffee in chocolate cake will enhance the chocolate flavor of the cake. If you don’t have brewed coffee, you can dissolve instant espresso powder in hot water per packaging instruction instead.
- Instant espresso powder for the frosting – I use Medaglia D’Oro instant espresso, I got it at Sprouts. Note that this is instant espresso not regular instant coffee, you could substitute instant coffee but the flavor will be milder. DO NOT substitute regular ground coffee here. We want to use instant because the granules will dissolve in the frosting, otherwise you will have gritty frosting from the coffee ground.
- For a decaf version: use decaffeinated coffee for the cake and decaffeinated instant coffee for the frosting.
As for the type of cocoa powder, I always prefer Dutch-processed for a richer chocolate flavor. But since we have the brewed coffee enhancing the chocolate flavor in the cake, you can use whichever type you have in your pantry. However, the color of the cake will be a little different.
- Dutch-processed cocoa will result in a darker color cake.
- Natural cocoa will result in a lighter color with a slight red tint.
I used a little bit of melting chocolate to fold into the coffee frosting to make a mocha frosting. But this is totally optional.

Pro tips for making Coffee Mocha Cake
For detailed instructions with step-by-step photos, skip to the recipe card.
This chocolate cake can be baked in many different ways. Here are some tips for making different versions of this mocha cake, even cupcakes and sheet cake!
- For 2-layer cake: I used a kitchen scale to divide the cake batter to be more precise and ended up with about 700 g of batter per pan for a 2-layer cake. This will help the two cake layers bake more evenly.
- For 3-layer cake: If you want to make a 3-layer cake, you can increase the recipe by 1.5x or divide the batter into 3 cake pans for thinner layers. Thinner layers will bake quicker so make sure to reduce baking time if you do this.
- Make cupcakes: this recipe should make 24 cupcakes or halve the recipe to make a dozen delicious mocha cupcakes for a smaller celebration.
- Make sheet cake: you should also be able to bake this in a 9”x13” baking pan for a large one-layer sheet cake. Bake time may be a bit faster since there is more surface area of the cake exposed to the heat so keep an eye on it. The frosting recipe may yield a bit too much to frost a sheet cake though.
My espresso coffee buttercream frosting is a bit more advanced. All the process photos are in the recipe card and I have additional tips and tricks in a separate post as well. But here are some helpful notes:
- Start with clean equipment and tools: it is crucial to keep your equipment clean and grease-free for a successful meringue!
- For an easier frosting option: you can make my American buttercream frosting and infuse it with instant espresso powder instead. You’ll need to 1.5x or 2x the original recipe.
- The mocha frosting: I took 1 ½ cup of espresso buttercream and added melted chocolate to it to create an actual mocha buttercream. You can skip this step if you prefer to simplify the recipe.
- Decorate the cake: If you make the mocha frosting, I recommend using it for the filling between the two cake layers since you’ll need about 1 to 1 ½ cup of frosting there. But you can also use it for the outside if you prefer.
- Runny frosting: At any time during the decorating process, the frosting starts to feel soft or get runny, pop everything in the refrigerator for 15 – 30 minutes to let it firm up.
Storing and making ahead
You should store your frosted mocha cake in the refrigerator. But take it out about half an hour before serving to let the buttercream soften up a bit. Leftovers should be covered and refrigerated for up to a week, or you can freeze it for up to 3 months.
To freeze this cake, I would first refrigerate it to let the frosting harden completely, then cut it into individual slices, wrap each slice very well in plastic and store in a freezer bag. You can thaw frozen cake at room temperature about 2 hours before serving.
Each component of this cake also freezes very well. So if you want to make it ahead of time, I suggest making the cake layers and the frosting, and freeze them separately. You can thaw and assemble the cake the day you are planning to serve it.
For the frozen frosting, let it thaw at room temperature and re-whip it until light and fluffy before using.

Hungry for more?
Mocha Cake Recipe

Ingredients
For the Coffee Mocha Cake
- 2 cup all-purpose flour, 270 g
- ¾ cup cocoa powder, Dutch-processed preferred, 60 g
- 2 cup granulated sugar, 400 g
- ½ teaspoon kosher salt
- 1 teaspoon baking soda
- 1 teaspoon baking powder
- 1 cup coffee, espresso or strong brewed, cooled, 236 g
- 1 cup buttermilk, room temperature, 238 g
- 2 large eggs, room temperature
- ½ cup oil, vegetable or canola, 102 g
- 1 teaspoon pure vanilla extract
- Melted butter for cake pans
For the Coffee/Mocha Buttercream
- ⅓ cup dark chocolate melting wafer, 2 oz, 58 g, optional
- 7 large egg whites, 7 ¾ oz, 219 g
- 1 ½ cup granulated sugar, 281 g
- 1 ½ teaspoon lemon juice, or vinegar
- 20 oz unsalted butter, room temperature, cubed or cut into thin pats, 5 sticks, 567 g
- 1 teaspoon pure vanilla extract
- 4 tablespoon instant espresso powder, 20 g
- A big pinch of kosher salt
Instructions
- Preheat the oven to 350°F.
- Brush two 8” cake pans with melted butter. Line the bottom of each cake pan with a piece of round parchment paper and brush the parchment paper with butter as well. Set aside.Melted butter for cake pans

- Make the cake batter: In a medium mixing bowl, sift flour, cocoa powder, baking soda, and baking powder together. Add salt and sugar, and whisk until evenly distributed.2 cup all-purpose flour, ¾ cup cocoa powder, ½ teaspoon kosher salt, 1 teaspoon baking soda, 1 teaspoon baking powder, 2 cup granulated sugar

- In a large mixing bowl, whisk together cooled coffee, buttermilk, oil, egg and vanilla until thoroughly combined.1 cup coffee, 1 cup buttermilk, 2 large eggs, ½ cup oil, 1 teaspoon pure vanilla extract
- Add the dry ingredient mixture into the wet ingredient mixture and stir until a smooth batter forms. But be careful not to over mix here.
- Bake the cake: Divide batter evenly among the two prepared cake pans and bake for 30 – 35 minutes until a toothpick inserted in the middle of the cake comes out clean with just a few crumbs attached. If you’re using a kitchen scale for precise measurement, you should get about 700 g of cake batter per pan.
- Remove the cakes from the oven and let cool on a wire rack for 20 – 30 minutes. When you can comfortably touch the cake pans, use a butter knife to loosen the sides, flip the pan over to remove the cake from the pan. Peel off the parchment paper, and allow the cakes to cool completely on a wire rack before adding frosting.
- Make the frosting: Start by melting the ⅓ cup of dark chocolate melting wafer in a glass bowl set over a pot of simmering water. Stir until smooth and set aside to cool. Skip this step if you aren’t making the optional mocha buttercream.⅓ cup dark chocolate melting wafer

- Add egg white and sugar to a heatproof glass bowl and place it over a pot of boiling water without allowing the bottom of the bowl to touch the water, reduce heat to keep the water simmering and not boiling over. Whisk the mixture constantly until all the sugar dissolves and the mixture reaches 160°F.7 large egg whites, 1 ½ cup granulated sugar
- Carefully remove the bowl from the pot and wipe the bottom and side dry. Transfer the egg white mixture into your stand mixer bowl and beat with the whisk attachment on medium speed. Stream in the vinegar or lemon juice, and continue beating until stiff peak forms and the meringue is shiny and smooth.1 ½ teaspoon lemon juice
- Reduce mixer speed to low and slowly add the room temperature cubed butter, one cube at a time, allowing it to incorporate into the meringue before adding another. The mixture may curdle but just keep beating until it comes together.20 oz unsalted butter
- Once all the butter has been incorporated, add vanilla extract, instant espresso powder, and a pinch of salt, beat on medium-high speed until buttercream is light and fluffy.1 teaspoon pure vanilla extract, 4 tablespoon instant espresso powder, A big pinch of kosher salt
- Make the optional mocha buttercream: Once the espresso buttercream is ready, transfer everything to another mixing bowl leaving just 1 ½ cup of frosting in your stand mixer bowl and mix in the cooled melted chocolate, beat until fluffy.
- Assemble the cake: Line a cake stand or plate with a few strips of parchment paper around the edges and place 1 layer of cake on top. Add between 1 to 1 ½ cup of buttercream on top of the first layer and spread it out evenly with a spatula. I recommend using the mocha buttercream for the filling in this step.
- Place the second layer of cake on top. Add ½ cup of espresso buttercream on top of the second layer and spread it out evenly with a spatula. Use another ½ cup of espresso buttercream to cover the side of the cake.
- Refrigerate the cake and the remaining frosting for 15 – 30 minutes to firm up before piping decorations on the cake. You can also do this at any time during the decorating process when the frosting starts to get too soft or runny.
- When ready to finish decorating the cake, carefully pull out the parchment paper lining the plate or cake stand from the bottom of the cake. Add the remaining espresso buttercream to a pastry bag fitted with a French star tip #8FT and pipe decorations to cover the top and side of the cake.
- Refrigerate the cake for 2 hours before serving.


Notes
- Type of cocoa: I preferred Dutch-processed cocoa powder for a deeper chocolate flavor but natural cocoa powder will work too.
- Frosting yield: the coffee buttercream frosting recipe yields about 6 cups.
- Clean equipment and tools: it is crucial to make sure your equipment and tools are clean and grease-free when making the meringue for the frosting.
- For a decaf version: use decaffeinated coffee for the cake and decaffeinated instant coffee for the frosting.
- Storage: this cake will last in the refrigerator for up to a week and in the freezer for up to 3 months. But serve at room temperature for the best texture.
Nutrition
Nutrition information is automatically calculated, so should only be used as an approximation.
 Like this recipe? Rate & comment below!
More amazing layer cake recipes
- If you want more amazing chocolate layer cake, this Peanut Butter Chocolate Cake and this Oreo Cake fit the bill. They’re both 3-layer cakes and the chocolate cake layers do not contain any coffee.
- If you’re in the mood for spiced cake instead of chocolate, this Hummingbird Cake or this Carrot Cake always hits home! And they both can be baked in a 9”x13” pan for an easier pot-luck version.
- And this amazing Apple Pie Cake should be your go-to for all holiday celebrations!
This post may contain affiliate links. For more details on how we utilize affiliates, ads, and sponsored content, see our full disclosure policy. Thank you for your continued support, which enables us to keep bringing you delicious recipes, at no extra cost to you.


Update on my earlier post. Good news. I halved this recipe and made it. It’s good but I do Prefer the chocolate one over this one as a 6×2. I used gram measurements on everything to make it as accurate as possible. Since I’m in high altitude Denver, it can be tricky but the cake itself turned out great. My frosting was a bit more challenging. First, the buttercream curdled. I was Able to fix it on the stove and it worked fine like new. But again, when adding the optional chocolate wafers- I used Ghirardelli, the chocolate curdled into the frosting mixture you asked me to separate. Not sure why this keeps happening to me. I’m using my kitchen aid stand mixer. For some reason, my frosting isn’t sweet enough. I think A little sweeter would have turned out better on this frosting. It could be because I halved the recipe in grams. Not sure. This isn’t an issue with the carrot, chocolate or strawberry cakes I’ve made from your blog. Maybe if I let It sit overnight in the fridge, it will get sweeter. Thank you for the recipe.
Thank you for your comment, Mia! Have you made my swiss buttercream frosting before? It will curdle when you first add the butter but it takes sometimes to fully incorporate and beat it until smooth. Or was your curdling at a different step? Was the chocolate cooled down enough before you add it to the frosting? I’ve never tried this before with swiss buttercream, but if the frosting is not sweet enough, add some powdered sugar at the end and see if it helps.
Hello,
I love your cakes and I would like to make this one for the first time however I am one person and prefer the mini cakes you have in your blog which are amazing. As another commentator past, if I want to make this as a 6×2 2 layer, if I half it, do you think it would work? I’m assuming every ingredient would just be halved for it to work. Have you ever personally tried? Thank you so much in advance for your guidance. Also, I will update my review of how it turns out after I make it.
Hi Mia, I have not tried personally but it should work cutting everything in half. I have a small chocolate cake recipe that can work as a guide for you regarding the size and bake time. Good luck and let me know how it turns out!
Hello Trang! I would like to incorporate some coffee liqueur into the cake. How much and when would you recommend?
Hi Kristen, you can use the liqueur in the cake batter, replace some of the coffee with the liqueur. I recommend 1/4 cup to start in case the flavor is too strong. See how you like it and decrease or increase the amount next time.
Can this cake also be done by using the creaming method?
Hi Keon, creaming method is used with butter, this recipe calls for oil. If you’re planning to substitute butter, you can use the creaming method but I recommend sticking with the recipe as written for the best results as I did not test this recipe using the creaming method.
Hi – does it have to be melting wafer chocolates? or any other chocolate will do? thanks!
You can use other chocolate. The one I used is about 45-50% cocoa.
I love coffee and chocolate too, so I was immediately drawn to this. The cake is so moist and that creamy frosting is totally divine. Definitely a winner.
Thank you so much Marie!
This looks amazing and I can’t wait to make it.
Question…(I’m not a baker) Would this work if I split the recipe in half? Would I need to adjust the baking times?
Thanks for all you do!
Yes, you can split it in half. It would bake in one 8″ pan for a 1 layer cake, the bake time will be a little less but closer to the same. Or you can bake it in two 6″ pan for a smaller 2 layer cake, the bake time for this will be less, around 25 mins.