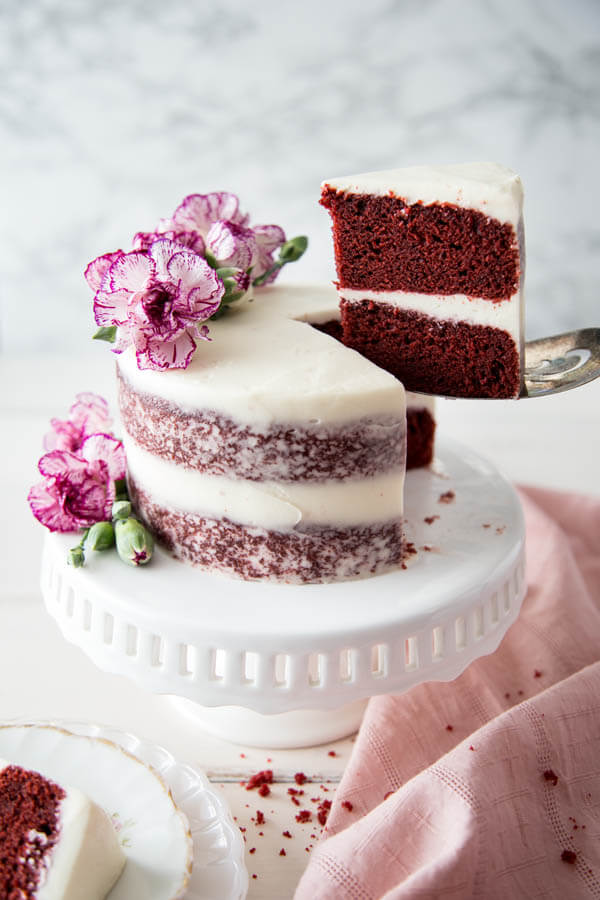
A classic cake recipe like this Red Velvet Cake recipe is a must-have in your dessert arsenal. Better yet, the smaller size of this mini red velvet cake makes it the perfect everyday occasion dessert, a great way to end tonight’s dinner.

Red velvet cake with cream cheese frosting is my absolute favorite cake flavor, and I promise you, it’s for good reason! The cake has super moist crumbs and is slightly chocolatey. It’s covered in a tangy and silky cream cheese frosting that I wouldn’t hesitate to eat with a spoon.
This mini red velvet cake will give you 6 generous size servings, and 8 smaller servings if you want to stretch it. It’s small and mighty, but no less impressive than the full size version. It is perfect for birthdays, Valentine’s Day, holidays and everyday occasions.
How to Make Red Velvet Cake from scratch
Red Velvet Cake is not just a white cake with red dye. It has a distinct and complex flavor from the addition of cocoa powder and buttermilk in the cake batter plus the signature tanginess from the cream cheese frosting.
The easy red velvet cake batter
To make the cake batter, you will need a couple of mixing bowls and a whisk. No electric mixer or stand mixer is needed for the cake, but you’ll need it for the frosting.

- In a medium mixing bowl, sift together flour, cocoa powder, baking soda, and baking powder to get rid of any lumps to ensure a smooth batter.
- Whisk sugar and salt into the sifted flour mixture.
- Beat buttermilk, vegetable oil, melted butter, egg, vanilla extract, and liquid red food color together in a large mixing bowl with a whisk.
- Add the flour mixture to the liquid mixture.
- Mix with a whisk until smooth.
- Divide batter into two 6” cake pans. Prepare the pans by brushing with melted butter and line the bottom with parchment paper cut to fit.
- Bake until a toothpick inserted in the middle comes out clean with just a few crumbs attached.

Why isn’t vinegar used in this red velvet cake recipe?
Most red velvet cake recipes will call for a small amount of vinegar. Just a half teaspoon to one teaspoon of vinegar is used to facilitate a reaction with the baking soda and help the cake rise.
Baking soda is basic while vinegar is acidic, these two ingredients react to form carbon dioxide gas, which gives rise to the cake. But keep in mind that buttermilk is also acidic, and will give the same result.
This red velvet cake recipe calls for plenty of buttermilk and that’s why vinegar is not absolutely necessary. I also use baking powder in this recipe as well to ensure a good rise in the oven.
Do I have to use red food coloring?
Well, the quick answer is yes. I like using McCormick brand liquid red food color, the one you can easily get from the grocery store. Half a bottle is just enough for this recipe. The results are always consistent and vibrant.
If you want to reduce the amount of red food coloring in your cake, you could try a gel red food color. However, a word of warning, I haven’t been able to find a brand that gives a vibrant red color to this cake. The one I tested this recipe with yielded a darker, more purplish tone.
Can I use beet? I’ve attempted to make red velvet cake with beet before and the resulting flavor was too earthy, not quite the classic red velvet cake flavor I was looking for. Though I haven’t tried beet powder yet.

The frosting
To me, a red velvet cake isn’t complete without its signature tangy cream cheese frosting. This particular cream cheese frosting is not too sweet, and the tanginess compliments the cake flavor well. The simple cream cheese frosting is made with just four ingredients:
- Cream cheese
- Unsalted butter
- Pure vanilla extract
- Powdered sugar
All the ingredients for the frosting are creamed together in a stand mixer or with a handheld electric mixer for the best results. Be sure to allow butter and cream cheese to soften at room temperature before making the frosting.
If you prefer a frosting that is less tangy and a little sweet, my runner-up recommendation is a swiss buttercream frosting. It is an egg white base buttercream, that is just as silky and creamy, without the tang. But keep in mind, cream cheese frosting is the more classic choice.
Other tips for the best red velvet cake recipe
Use a kitchen scale to divide the cake batter if you want to be precise, which will also help the cakes bake evenly. This mini red velvet cake recipe will give you approximately 320 grams of batter for each 6” cake pan.
Grease your cake pans well – Use melted butter to brush the bottom and side of your cake pans, then line the bottom of the pan with a piece of round parchment paper cut to fit the cake pan you are using. Then also brush the parchment paper with melted butter. This will ensure easy and clean release of the cake.
Cutting the parchment paper to fit your cake pans – Just place a cake pan on top a piece of parchment paper and trace it with a pen, then cut along the tracing to get a round piece of parchment paper that will fit inside your cake pan.
Love red velvet? Try these!

Hungry for more?
Mini Red Velvet Cake Recipe

Equipment
- 6" Cake Pans
Ingredients
Cake
- 1 ¼ cups all-purpose flour, 162 g
- ½ teaspoon baking soda
- 1 teaspoon baking powder
- 2 tablespoon cocoa powder, 11 g
- ¾ cup granulated sugar, 136 g
- ¼ teaspoon salt
- ¾ cup buttermilk, 172 g
- ¼ cup vegetable oil, 51 g
- ¼ cup unsalted butter, melted & cooled, 2 oz, 57 g
- 1 large egg
- 1 teaspoon pure vanilla extract
- 1 tablespoon red food color, 13 g
- Melted butter for cake pans
Frosting
- 8 oz cream cheese, room temperature, 226 g
- 4 oz unsalted butter, room temperature, 113 g
- ½ tsp pure vanilla extract
- ¾ cup powdered sugar, 75 g
Instructions
Make the red velvet cake
- Preheat the oven to 350°F.
- Brush melted butter on two 6” round cake pans. Line the bottom of the cake pan with a piece of round parchment paper and brush the parchment paper with butter as well. Set aside.
- Sift together flour, cocoa powder, baking soda, and baking powder into a medium mixing bowl. Add sugar and salt to the flour mixture, and mix thoroughly with a whisk. Set aside.
- Add buttermilk, oil, melted butter, eggs, vanilla extract, and red food color to a large bowl. Beat with a whisk until combined. Add the flour mixture to the liquid mixture, and whisk until a smooth batter forms.
- Divide batter evenly among the two prepared cake pans and bake for 24-27 minutes until a toothpick inserted in the middle of the cake comes out clean with just a few crumbs attached. Use a kitchen scale to divide the cake batter if you want to be precise, approximately 320 g of batter per pan. This will also help the cake bake evenly.
- Remove from the oven and let cool on a wire rack for 10 – 15 minutes. When you can touch the cake pans, use a butter knife to loosen the sides, flip the pan over to remove the cake from the pan. Peel off the parchment paper, and allow the cakes to cool completely on a wire rack before adding frosting.
Prepare the cream cheese frosting
- In a large mixing bowl or a stand mixer bowl, cream butter and cream cheese together until thoroughly mixed and creamy.
- Add vanilla extract and beat to combine.
- Add powdered sugar and stir until incorporated, gradually increase the mixer speed and beat until fluffy. Use right away.
Assemble and frost
- Place the first layer of cake on a cake stand or plate, spread 1/2 cup of frosting on top with an offset spatula. Place the second layer on top of the frosted first layer, and spread another cup of frosting on top using the same offset spatula. Then add a thin layer of frosting on the side.
- Refrigerate the frosted cake for at least 30 minutes before serving to allow the frosting to set.
Nutrition
Nutrition information is automatically calculated, so should only be used as an approximation.
 Like this recipe? Rate & comment below!
This post may contain affiliate links. For more details on how we utilize affiliates, ads, and sponsored content, see our full disclosure policy. Thank you for your continued support, which enables us to keep bringing you delicious recipes, at no extra cost to you.


I just tried this recipe, I followed the recipe exactly and I just divided the batter into cupcakes! They came out really good. The cake is moist and fluffy. I highly recommend using the food coloring per recipe!
I used the frosting recipe to decorate the cupcakes and it worked perfectly!
Thank you!!! So glad you liked it 🙂
Hi there, I am dying to make this and am so happy to see a smaller cake recipe! I want to make small cakes for my family of 4. I am thinking a 4 or 5 inch pan, 3 layers. Which do you think would work best and how would I best adapt your recipe? Thank you!
Hi Sydney, the batter for this recipe should be enough for three 5” layers. It will bake faster since it’s smaller so just make sure you don’t over bake. There isn’t much you have to change except for the bake time, I don’t know how long it will take but I’d say check at 15-20 mins, and bake longer if needed.
I am not a red velvet cake fan, but thought it was good. However, my red velvet cake loving family members said it was:
Great
Best red velvet cake ever
Moist
Really really good
So even though it’s nit my favorite cake, I have orders to bake more.
How many cupcakes would this recipe make?
Hi France, I recommend this red velvet cupcake recipe instead.
Hi, I Looooove this cake! Just wondering if I can use this recipe to make a sheet cake approx. 15×12 inches? How long would I need to bake the cake for? Thank you 🙂
Hi Yaslin, that’s a really big sheet cake. You’ll need at least 3x this recipe, maybe even a little more. I don’t know exactly how long since I’ve never made sheet cake but I would suggest perhaps 20 – 30 minutes, and then check the doneness with a toothpick.