
These cute little Red Velvet Cake Cookies are filled with a luscious cream cheese frosting just like your favorite red velvet cupcakes. Decorate them with Christmas sprinkles to add to the seasonal festivity.

For as long as I remember, red velvet cupcakes were the first recipe I made when I picked up baking again after college. Thus, they have a very special place in my heart, aside from being absolutely delicious! This is my round about way to say that I love everything red velvet and that’s why these red velvet cake cookies exist.
These cookies use almost the same dough as my red velvet white chocolate chip cookies but in a smaller batch. Bake them in a mini muffin tin to get the cupcake shape. It is very simple to make, let me show you how!
Table of Contents
Why you’ll love this recipe
- Delicious flavor and amazing texture – the cookie portion of these red velvet cake cookies is chewy and crispy with a hint of chocolate, while the creamy and tangy cream cheese frosting gives a contrasting texture giving them a big punch of flavor despite their little size.
- Addicting in the best way possible – there is something about that hint of chocolate and the tangy cream cheese frosting that makes these quite addicting.
- Perfect 2-bite size – these are indulgent for sure but they are also tiny which makes them easy to enjoy without the guilt.
Tools you’ll need
I use my trusty old stand mixer to make the cookie dough and the frosting. There is quite a bit of mixing going on in this recipe so having a stand mixer or an electric hand mixer will help a lot.
You will need a mini muffin tin, not a standard size one, to bake these cookies in. It is essential if you want to form them into mini cupcakes.
I also use a small cookie scoop to divide the cookie dough. It makes it quicker, cleaner and easier.
You’ll also need a pastry bag and 1M pastry tip to add swirls of frosting on top the cookies.

Ingredients and substitutions
As always, you’ll find the complete list of ingredients and quantities in the recipe card at the end of this post. Below are some notes and substitution tips:
- Unsalted butter – this is used in both the cookie dough and the cream cheese filling. While you can substitute salted butter for the cookie dough, you DO NOT want to use salted for the cream cheese filling or you’ll end up with super salty filling that is not tasty at all.
- Brown sugar – light or dark brown will both work. In a pinch, you can use granulated.
- Egg
- Vanilla – only use pure vanilla extract for the best flavor.
- Red food color – this makes it “red velvet.” If you are not a big fan of food color, you can skip this since it doesn’t alter the taste but your cookies won’t really be “red velvet cake cookies” anymore.
- All purpose flour
- Cocoa powder – I prefer dutch-processed for a deeper chocolate taste, but you can use either dutch-processed or natural cocoa powder.
- Salt – I use kosher salt, you can use just half if you’re using salted butter for the cookie dough.
- Baking soda & baking powder – I frequently use both in my cookie recipes.
- Cream cheese – this is for the cream cheese filling, use full fat brick cream cheese. The one in the tub will work too but make sure it is not “whipped” cream cheese.
- Powdered sugar – same as icing sugar or confectioner’s sugar.
- Sprinkle – optional and you can use a different theme for a different holidays.
How to make red velvet cake cookies
The following instructions, step-by-step photos, and tips are here to help you visualize how to make the recipe. You can always skip straight to the printable recipe card at the end of this post.
Make the red velvet cookie dough
Beat together melted butter and brown sugar until light in color and fluffy. This will take about 2 minutes.

Next, add egg, vanilla and red food color and beat again for another 2 minutes until your wet ingredient mixture is creamy and fluffy.
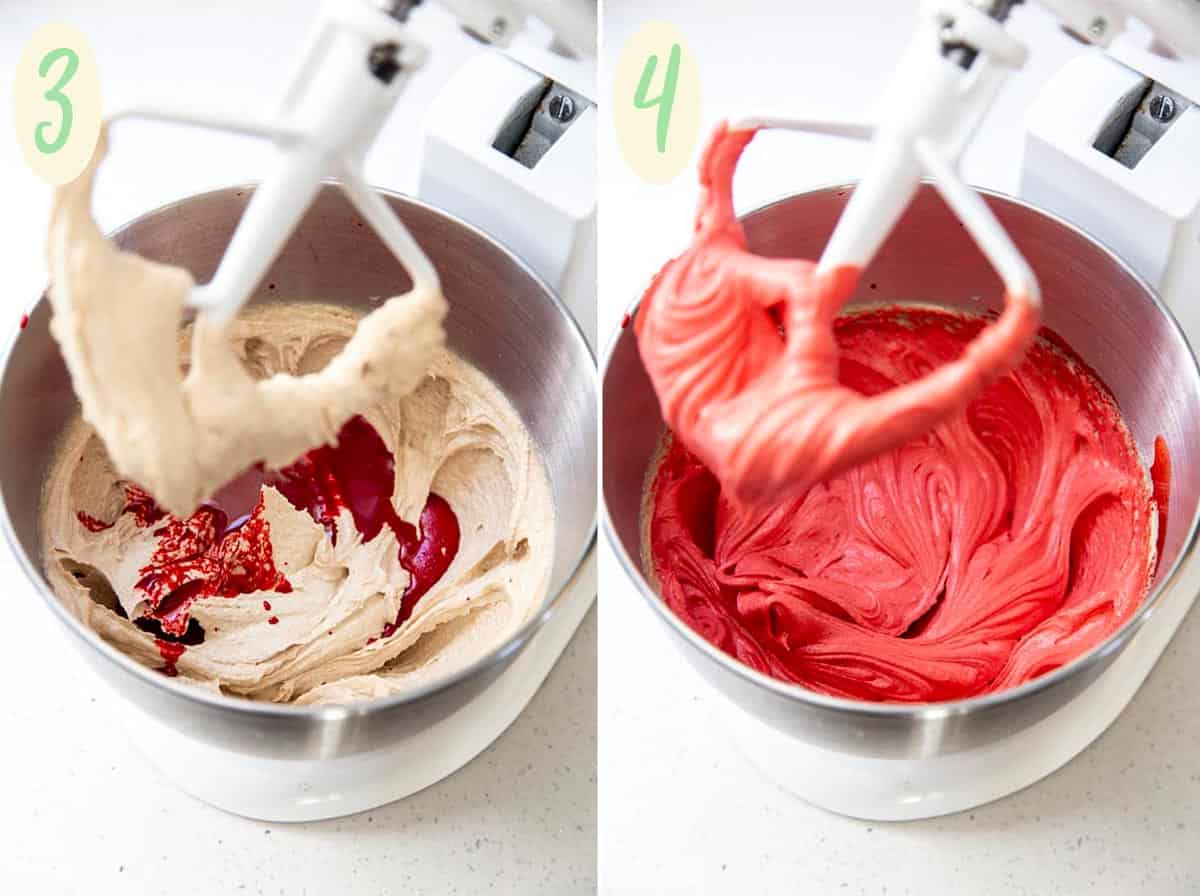
Now, you’ll want to sift the dry ingredients together to make sure there is no lumps, and add that to the wet ingredient mixture. Mix until the cookie dough forms.

Note: At this point, you’ll want to refrigerate the dough for a short time while you prepare the muffin tin and preheat the oven. Don’t forget about the dough because it will harden if you refrigerate it too long and it will be difficult to scoop.
Bake the cookies
Once you’re ready to bake, divide the dough evenly into 24 mini muffin cavities and bake. As soon as the cookies are ready and out of the oven, you can use the back of a teaspoon to press a small cavity in the middle to create the “cup” for the frosting.

Note: You have to create this “cookie cup” as soon as the cookies come out of the oven, still hot and soft. Once they cool and harden, you won’t be able to press into them easily anymore.
Make the cream cheese filling
Beat together softened butter and cream cheese along with vanilla and powdered sugar until you get a fluffy creamy frosting.

Decorate your cookies
Make sure your cookies are completely cool before piping the frosting into the “cup” portion and garnish them with sprinkles.

More baker’s tips
- To chill or not to chill – Refrigerating this red velvet cake cookie dough will allow the butter to solidify and the sugar to absorb more liquid. This will result in a crispier and chewier cookie that will also spread less in the oven. It is not super critical if you’re baking these in a muffin tin but if you’re baking them on a baking sheet, you’ll want to chill them a little longer to curb spreading.
- Making them into cookie cups is not necessary. It is more for the fun factor and to create a spot for the filling, but you can just leave them in their cupcake form and pipe frosting on top exactly like mini cupcakes.
Storage
The red velvet cookie cups without the cream cheese frosting can be stored at room temperature in an airtight container for 3-5 days. Frosted cookies should be stored in the refrigerator due to the dairy in the frosting. Refrigerated cookies will last 3-5 days a well.
Similar to my other cookie recipes, this red velvet cake cookie dough can be frozen for 3-6 months. You can bake it directly from frozen, just add an extra minute to the bake time.
Frosted cookies can also be frozen for 3-6 months. Freeze them in an airtight container in one layer so they don’t get stuck together because of the frosting.
FAQs
Yes, you can still bake these red velvet cake cookies on a baking sheet. You just won’t get them in a cupcake shape like I did. They will spread into a regular cookie shape. Once cool, add frosting on top as usual.
If you’re baking these without a muffin tin, you will want to refrigerate the cookie longer so they don’t spread too much. I also recommend dividing them into dough balls before refrigerating because the dough can harden if you refrigerate it too long, and it will become difficult to scoop.
You don’t need to use cupcake liner as long as you prepare the muffin tin as directed: brush with melted butter and sprinkle with flour. This should be enough to help you get the cookies out of the muffin tin easily. I think it is better not to use cupcake liner to get the crispy exterior to these cookies.
Yes, absolutely! You can freeze the baked cookies unfrosted, this does make freezing them easier since you can just toss them in a freezer bag without having to worry about messing up the frosting. They will last 3-6 months in the freezer. Defrost and add frosting whenever you are ready to serve them.

More Christmas treats
- Christmas Pinata Cupcakes
- Peppermint Chocolate Dipped Madeleines
- Peppermint Brownies
- Peppermint Chocolate Truffles
- Red Velvet Madeleines
Hungry for more?
Red Velvet Cake Cookies

Equipment
- Small Cookie Scoop
- Mini Muffin Pan
- Wilton 1M open star tip
Ingredients
For the cookies:
- 4 ounce unsalted butter, 113 g
- ¾ cup light brown sugar, 150 g
- 1 large egg
- 1 teaspoon pure vanilla extract
- 1 tablespoon red food color
- 1 cup all-purpose flour, 135 g
- 2 tablespoon cocoa powder, 12 g
- ½ teaspoon kosher salt
- ½ teaspoon baking soda
- ¼ teaspoon baking powder
- Melted butter and extra flour for pan
For cream cheese filling:
- 4 ounce unsalted butter, room temperature, 113 g
- 4 ounce cream cheese, room temperature, 113 g
- 1 teaspoon pure vanilla extract
- ½ cup powder sugar, 50 g
- Christmas sprinkles
Instructions
To make the cookie cups:
- Melt butter in a small sauce pan over medium heat and allow to cool to room temperature.
- Sift flour, cocoa powder, baking soda, and baking powder in a small bowl. Add the salt and whisk to distribute evenly.
- In a medium bowl, combined cooled melted butter with brown sugar, beat for 2 minutes until the mixture is light in color.
- Add egg, vanilla extract, and red food color; beat for another 2 minutes until fluffy and creamy.
- Slowly add flour mixture to the liquid mixture and stir until incorporated.
- Refrigerate the cookie dough while you preheat the oven and prepare the muffin pan.
- Preheat oven to 350°F.
- Melt about a tablespoon of unsalted butter and brush all the cavities of a mini muffin pan with melted butter and sprinkle with extra flour to coat the entire surface of each cavity.
- Remove cookie dough from the fridge, use a small ice cream scoop to divide the dough into 24 portions and place in the prepared muffin pan.
- Bake for 12 minutes in the middle oven rack.
- Remove from the oven and place pan on a wire rack.
- Immediately use the back of a teaspoon to press down on top of the baked cookies to create cavities for the filling.
- Leave the cookies in the pan until cool to the touch before removing them. Use a butter knife to loosen them from the muffin pan.
- Let them cool completely on a wire rack.
To make the cream cheese filling:
- Let unsalted butter and cream cheese soften at room temperature.
- Beat softened butter and cream cheese together with vanilla extract in a medium mixing bowl until well blended.
- Add powder sugar and beat until incorporated and fluffy.
- Use a piping bag to fill the completely cooled cookie cups with cream cheese filling and top with Christmas sprinkles.
Notes
- Don’t forget the cookie dough in the fridge, long refrigeration time will harden the dough and make it difficult to scoop.
- If you don’t have a muffin pan, bake these on a lined baking sheet and frost the top of the cookies as usual. You may want to refrigerate the dough longer, at least 1 hour, so the cookies don’t spread too much.
- You do not need to use cupcake liners.
Nutrition
Nutrition information is automatically calculated, so should only be used as an approximation.
 Like this recipe? Rate & comment below!
This post may contain affiliate links. For more details on how we utilize affiliates, ads, and sponsored content, see our full disclosure policy. Thank you for your continued support, which enables us to keep bringing you delicious recipes, at no extra cost to you.


Can you use mini cupcake paper cups?
Are you worried about the cookies getting stuck to the pan? They shouldn’t. I think the outside of the cookies would get crispier without the paper liner, so I would advise against using paper liner.
Can you freeze the cookie and then frost when ready to use?
Yes there are two ways you can freeze.
1. Divide the dough into portions and freeze them unbake. When ready to bake follow the recipe directions again.
2. Bake the cookies and shape them into cups, then freeze them. Thaw before frosting and serving.
These cookie cups look absolutely divine! Perfect for any time of year, too 😀
LOVE how easy and festive they are…and an awesome way to get just a little more frosting into each bite <3