
This Chocolate Mochi or Mochi Brownie is a chocolate variation of my very popular Hawaiian Butter Mochi, a buttery and chewy dessert made with glutinous rice flour. If you’re craving for some gluten free brownies, this is a great option!

I first tried the original Hawaiian Butter Mochi when we visited Hawaii some years ago, but have actually been making a very close version of it for a long time with this coconut mochi recipe – given to us by my husband’s aunt. I even made a matcha mochi variation and a guava mochi variation way before this chocolate mochi variation was born.
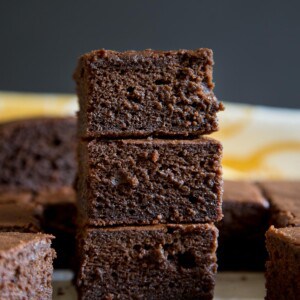
And boy, it is worth the wait though! This chocolate mochi tastes just like a delicious rich brownie but with a chewy mochi texture. Hence, it’s also called mochi brownies or brownie mochi or Brochi (brownie + mochi)! This amazing treat is also naturally gluten free since it’s made with sweet rice flour. So my gluten free friends, rejoice!
Table of Contents
What is Mochi?
There are two types of Mochi: Hawaiian butter mochi and Japanese mochi. This chocolate butter mochi is more akin to Hawaiian butter mochi which is a type of cake made using Mochiko or sweet rice flour, or glutinous rice flour, instead of using all-purpose flour like a typical cake.
Whereas Japanese mochi is typically made by steaming sweet rice, then pounding and shaping it into round sticky rice cakes. It can be served plain or with sweet red bean filling. It can also be made with sweet rice flour combined with sugar and water or milk, heated up until the mochi is formed.

Ingredients and Substitutions
As always, you’ll find the complete list of ingredients and quantities in the recipe card at the end of this post. Below are some notes and substitution tips:
- Mochiko or sweet rice flour – this is a shorter grain rice and is very sticky when cooked. You cannot substitute wheat flour and you have to use the correct type of rice flour for this recipe to work. I always use Koda Farms Mochiko but there are other brands of sweet rice flour that I think will work in this recipe as well – as long as it is sweet rice flour or glutinous rice flour. A reader tested Shiratamako – this did not work well, so it is not recommended.
- Baking powder – a small amount is used for leavening.
- Cocoa powder – natural or Dutch-processed cocoa powder should both work but I prefer Dutch-processed for deeper chocolate flavor. Tip: to enhance chocolate flavor even further, add instant espresso powder.
- Sugar – I used granulated sugar, but you can use brown sugar or raw sugar in the same amount. Some readers have used sugar substitute – splenda brown sugar and erythritol – with success!
- Salt – a little bit of kosher salt is used to enhance flavor.
- Butter – unsalted butter is used. Salted butter might make the final mochi brownies too salty but if you substitute salted butter, you can omit the salt called for separately.
- Chocolate chip – I used dark chocolate chips. You can substitute semisweet or bittersweet chocolate. And they don’t have to be chocolate chips, you could use a chocolate bar or any type you like.
- Vanilla extract – use pure vanilla extract for the best flavor. Vanilla will enhance the flavor of chocolate.
- Eggs – two whole eggs to bind.
- Coconut milk – you must use unsweetened canned coconut milk and not coconut milk from the carton. Canned coconut milk has higher fat content which results in a richer chocolate mochi. Substitutions: half and half (half milk half heavy cream) or coffee cream, you could use whole milk but the brownies will not be as rich. Note: I also tested coconut cream with this recipe, but found it to be too rich! The recipe does call for just 1 cup of coconut milk, not 1 can.
How to make Chocolate Mochi
The following instructions, step-by-step photos, and tips are here to help you visualize how to make the recipe. You can always skip straight to the printable recipe card at the end of this post.
- Melt butter and chocolate chips together, allow to cool slightly, then beat together with eggs, vanilla and coconut milk.
- Mix together the dry ingredients and add to the wet ingredients.
- Stir until completely smooth.

Tip: I melted the chocolate in hot butter and allowed it to cool slightly before mixing it in with the rest of the wet ingredients to avoid cooking the eggs.
- Transfer batter to a buttered and lined baking pan.
- Bake at 350F for 25-30 minutes.

Note: some readers have reported it took them longer to bake, so just make sure you bake until a toothpick inserted in the center comes out clean with just a few crumbs attached.
More baker’s tips
- For more chocolate goodness – you can sprinkle more chocolate chips on top before baking.
- Make sure to butter the parchment paper well – I just want to emphasize this point again because a reader forgot and the mochi got stuck to the paper really well.
- Bake time – I’m not sure why people end up with varying bake time on this recipe but I will note again that it took around 30 minutes when I tested the recipe. If you know your oven runs hot, you could reduced the baking temperature to 325 degrees F or increase it if you oven runs cold. Some readers said it took them 60 minutes to fully bake.
- For a larger batch – double the recipe and bake it in a 9×13 baking pan.
Storage
- Room temperature: these will last 1-2 days at room temperature. Beyond that, it is best to refrigerate them so they don’t go moldy.
- Refrigerator: they will last up to 2 weeks in the fridge.
- Freezer: they will keep up to 3 months in the freezer. To freeze, wrap each piece well in plastic and/or foil and place them in a freezer bag. Thaw completely at room temperature before serving.
Refrigerated and frozen butter mochi will lose their bounciness once thawed. Reheat in the microwave for about 20 seconds to soften. Tip: wrap the piece of butter mochi in plastic or a damp paper towel to keep them from drying out.

Hungry for more?
Chocolate Mochi Brownies
Ingredients
- 1 ¼ cup Mochiko, 190 g
- 1 rounded teaspoon baking powder
- ¼ cup cocoa powder
- ¾ cup granulated sugar
- A big pinch of kosher salt
- 2 oz unsalted butter – melted
- ½ cup dark chocolate chip, ~ 3 oz
- 1 teaspoon pure vanilla extract
- 2 large eggs
- 1 cup unsweetened canned coconut milk
- Extra butter for pan
Instructions
- Preheat oven to 350°F.
- Brush the bottom and sides of an 8”x8” square baking pan with melted butter, line the pan with a long strip of parchment paper and let the excess hang over the side. Brush the parchment paper with butter as well and add another long strip of parchment paper crosswise. Brush with melted butter again and set aside.
- In a medium mixing bowl, add mochiko, baking powder, cocoa powder, sugar and salt and stir with a whisk until evenly distributed. Set aside.
- Melt butter in a small bowl in the microwave for 40-45 seconds. Add chocolate chip to the hot butter and stir to melt the chocolate completely.
- In a large mixing bow, add vanilla, eggs, coconut milk and beat with a whisk until smooth. Add the melted butter and chocolate mixture and beat until combined.
- Stir in the dry ingredients and mix until completely smooth.
- Pour the mixture into the prepared pan and bake for 25-30 minutes until a toothpick inserted in the middle comes out mostly clean with just a few crumbs attached. Note: some readers have reported it took them longer to bake (60 minutes), so just make sure you bake until a toothpick inserted in the center comes out clean with just a few crumbs attached.
- Allow to cool completely before cutting and serving.
Notes
- Refrigerate left over. To reheat, wrap a piece of mochi in a damp paper towel and microwave for 10-15 seconds depending on the size you cut them.
- Either natural or dutch processed cocoa powder can be used in this recipe.
- Use canned coconut milk, and not the one in the carton. Canned coconut milk has higher fat content and will result in tastier baked good.
Nutrition
Nutrition information is automatically calculated, so should only be used as an approximation.
 Like this recipe? Rate & comment below!
This post may contain affiliate links. For more details on how we utilize affiliates, ads, and sponsored content, see our full disclosure policy. Thank you for your continued support, which enables us to keep bringing you delicious recipes, at no extra cost to you.


This is excellent – great recipe, and great texture that keeps you coming back for more. To clarify, however, this is not mochi, which is made from 100 percent glutinous rice and is much chewier. It might be more accurate to call this Mochi Cake. While you can’t expect anything close to the chewiness of mochi, you do get a slight chewiness from the glutinous rice flour that is very compelling and makes it hard to eat only one. Will be a repeat recipe for me.
Hi Matt, you’re absolutely right, this not pure mochi, as in Japanese mochi made by pounding steamed sweet rice. This is a chocolate version of the Hawaiian Butter Mochi. It definitely is mochi cake!
Great texture and super chocolatey. Loved it. Saving recipe to make again.
Hi! I have been looking to try baking with mochiko, yours seems to tick all the boxes: has both cacao powder and melted chocolate, and has relatively less sugar. 🙂
Im wondering 2 things please:
– can cream or milk be used instead of coconut milk?
– can i play with the type of sugar? personally i am a fan of mixing in some brown sugar – i love the depth it adds to the baked goods
Thank you 🙂
Hi Mod:
1. You can use half and half (half cream half milk) to replace the coconut milk. This will mimic the fat content of the coconut milk. Cream alone would be too rich and milk alone would be too watery.
2. Yes you can certainly mix in brown sugar!
I made these a couple days ago, thank you for the recipe! Since my oven runs hot, I set it to 325 and pulled them out right at 25 minutes (I also wanted a bit of a crispy edge so i omitted the parchment paper lining). They were fantastic! I’ll absolutely have to make them again.
Thanks for the feedback Robin!
Hi there! Is it possible to use Shiratamako instead if Mochiko in this recipe? Thank you!
Hi Teresa, I have never worked with Shiratamko before but reading about it I would say yes you should be able to use it as replacement, but it is not necessary. It seems that Shiratamako is more expensive and harder to find, but if you already have it at home, then you can certainly use it. Please let me know how it turns out.
Thank you so much for replying!! I really appreciate it. I sifted the Shiratamako because it is chunkier. Although the chewiness was there, there were still tiny bits of it Shiratamako throughout, so my cake did not have the smooth surface like yours. Also, I only had coconut cream on hand, no coconut milk. I would not recommend using Shiratamako. I will definitely make this cake again. The recipe is a keeper, thank you for sharing it!!
Thank you Teresa! Good to know about the substitution result.
Hi Trang. I was going to make original butter mochi but your chocolate recipe sounds perfect for my family. Could I just add the chocolate ingredients to the Hawaiian butter mochi recipe for a larger yield? Also, can this be frozen?
Hey Sandy, if you want a bigger batch, I suggest doubling the chocolate butter mochi instead because it calls for slightly different ingredients in a different ratio, ie. it doesn’t have evaporated milk, it calls for coconut milk instead of coconut cream, etc. If you want to mix in the coconut flakes at the end, you can, but I do not recommend just adding chocolate to the regular recipe.
As for freezing it, I haven’t tried, but you should be able to. I would portion it into smaller pieces first, wrap well with plastic and freeze in a ziplock bag or airtight container. Thaw and microwave to warm it before eating the frozen ones.
These are delish! Thanks for this recipe.
Thank you Marissa!
Hi Trang! I loooove mochi. I’m on Keto right now – do you think subbing with granulated erythritol would yield the same results?
Hey Jessica, I think it would work but it may not yield the exact same result. My aunt made the green tea coconut mochi with a sugar substitute and I think she said it’s still good but didn’t come out exactly the same as mine, maybe it burned faster? So I would watch it in the oven to see how it does during the last 10-15 minutes to make sure it’s not burning. Let me know how it comes out!
Only 1 cup of coconut milk? Or did you mean 1 can?
Hey Carrie, it’s 1 cup. Make sure to shake the can well before pouring out 1 cup. This is a much smaller batch than the classic Hawaiian Butter Mochi.
These look absolutely divine. I keep meaning to try your original Mochi recipe but now I’m torn. I’ll need to go on the hunt for the right flour this weekend.